Using PlatformIO Serial Monitor and Sensors
Overview
Teaching: 0 min
Exercises: 90 minQuestions
How do I check the status of my logger in PlatformIO?
How do I add sensors to the EnviroDIY Mayfly?
Objectives
Learn the serial monitor. Set real time clock on Mayfly. Connect sensor to Mayfly.
Prerequisites
- A computer, an internet connection, and motivation to tinker and hack.
- For this episode, you’ll need an EnviroDIY Mayfly Data Logger Board, a micro-USB cable rated for data, a CR1220 Lithium Coin Cell 3V Battery, and the following accessories:
- a DS18B20 Waterproof Digital Temperature sensor and 4.7kΩ resistor,
- two Grove screw terminals and included Grove cables,
- a Grove BME280 Temperature, Pressure, and Humidity sensor,
- an I2C OLED display with Grove connector (optional), and
- a Grove I2C hub (if you use the OLED display).
Episode 6: Using PlatformIO Serial Monitor and Sensors
This lesson builds directly on Episode 5: Using PlatformIO and Mayfly. We will interactively explore the features of PlatformIO and finalize your readiness for using the EnviroDIY Modular Sensors sketches in Part 2 (Episodes 8-13).
Load your second sketch from PlatformIO to the Mayfly!
- Open the
platformio.inifile in the LearnEnviroDIYcode project and type a “;” in front of the “example1” sketch, and uncomment theExample_02_Mayfly_blink.inosketch to make that active. - Change “monitor speed” from 57600 to 115200 (this is on line 18 the
platformio.inifile). - Save the
platformio.inifile. - Push the Build/Compile button (checkmark), and after that has completed, push the Upload button (right arrow).
-
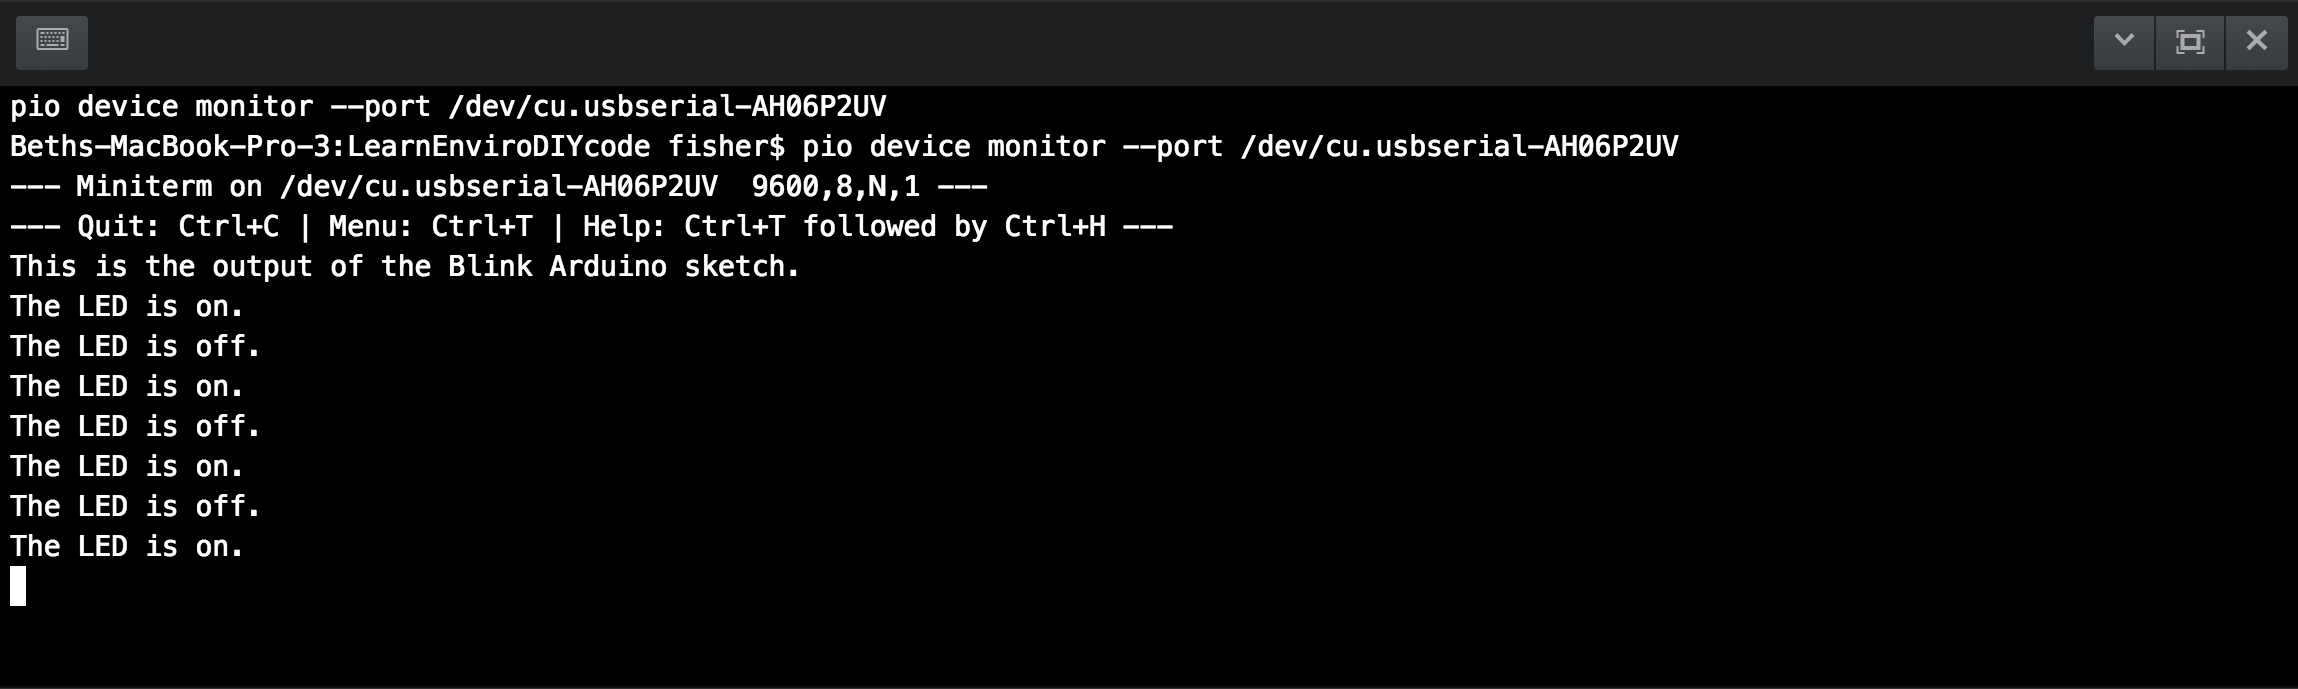
The Mayfly should blink as it did before, but now we will be able to check its status through the serial monitor by clicking the power plug button. (If the serial monitor is printing nonsense characters, your baud rate is not correct.)
Regarding your port selection:
In Windows your port will be
COM?, where ?=some number (but it won’t beCOM1). Every Arduino board that you plug into your computer will be seen as a completely unique and new piece of hardware, and Windows assigns each a sequentially higher COM number (until it reaches 99, but that’s a problem for another day).In MacOS your port will be a long string of gobbledygook with something about “usb” in the string (as shown above). Your serial output should look something like this:
When you are testing sensors in the Modular Sensors sketches, the serial monitor will help you confirm that all of your sensors are working correctly, which is an extremely useful thing.
Oh hey! There’s a sensor on the Mayfly!
- Your next task is to run
Example_03_Mayfly_temp.ino. We did not put it in theplatformio.inifile for you. Please add it to the “ini” file, save, Build, Upload, and run it on the serial monitor.- Notes:
- You can either type the file folder name into the “ini” file, or right-click on the directory (not the .ino file) for Example 3 and select “Copy Relative Path” (possibly two-finger click on MacOS, depending on your settings) and paste that into the “ini” file.

- It doesn’t hurt to check the baud rate in the sketch to make sure it matches your
platformio.inifile. - Your serial monitor should be outputting a temperature in degrees C once per second (or every 1000 milliseconds).
- You can either type the file folder name into the “ini” file, or right-click on the directory (not the .ino file) for Example 3 and select “Copy Relative Path” (possibly two-finger click on MacOS, depending on your settings) and paste that into the “ini” file.
- Notes:
Running sketches in PlatformIO
From this point forward we will not remind you of the steps to upload a sketch, so here they are for quick reference:
- Add your project directory in the src_dir list in
platformio.ini.- Double check that the baud rate in the sketch matches the setting in
platformio.ini.- Save
platformio.inito build all the directories needed for the sketch.- Build and upload the sketch.
- Run the serial monitor.
Set Real Time Clock on the Mayfly
-
We can manually set the Real Time Clock (RTC) on the Mayfly, which will be useful in your future with environmental sensors. Ideally we would let the Mayfly’s connection to the WiFi or data network sync the clock, but we will not always have that functionality. As long as your coin battery remains installed and alive, the RTC on your Mayfly will keep ticking. Note: Setting the RTC is a finicky task. NOTE: This procedure will work with PlatformIO for Atom, and with Arduino IDE, but it will not work with PlatformIO for VSCode, which does not have the ability to upload text to the Arduino via an open serial monitor.
- Set the baud rate to 57600 for this task. The sketch has this correct, but you may need to set it
platformio.iniasmonitor_speed = 57600and possibly when prompted by your serial monitor. If you have the wrong baud rate, the serial print may look fine, but any date you try to set will give an “out of range” error. - Upload
Example_04_Mayfly_setRTC.inoto your Mayfly. - Open the serial monitor to confirm that it is outputting a time (probably ~January of 2000). The date and time should be scrolling if your sketch and monitor speed are correct.
- Now open the Arduino IDE, select your port (Tools menu), and open the serial monitor (magnifying glass). The place to insert text is at the top of the serial monitor. There’s a “Send” button on the top right of the serial monitor.
- Open a web browser to the current unix time stamp at Sodaq or http://www.unixtimestamp.com/. I prefer the simplicity of time.sodaq.net.
- I like to split my screen between PlatformIO and my web browser for the next task.
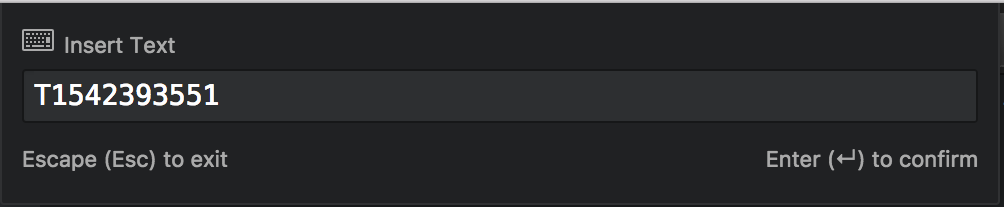
- As quickly as possible, you will need to copy the numeric unix time from the web browser and paste into the Arduino IDE Serial Text Insert box. For the sketch to receive this time it needs to begin with a T followed by the numeric unix time stamp. I type the T into PlatformIO, then refresh the browser, select the number, copy, insert my cursor after the T in Arduino IDE, paste, and immediately press [Enter] or click [Send].
- If it worked, your serial monitor will begin scrolling a time that is within a minute of the current time, which is good enough for now.
- Set the baud rate to 57600 for this task. The sketch has this correct, but you may need to set it
Connect OneWire sensor: DS18B20 waterproof temperature
-
Sensors use a variety of communication protocols, each with their own pros and cons. The waterproof temperature sensor in this example uses the One Wire protocol. The DS18B20 sensor has three wires: power, ground, and data, but OneWire sensors can take “parasitic” power over the data line (many sensors dedicate a wire to send and a separate wire to receive data, plus power and ground). Each communication protocol is limited in the length of cable you may use before the signal is too weak.
You may run many OneWire sensors on the same Arduino pin. This requires you to define the address of each sensor in your Arduino sketch. (Theoretically you could run more than 100 sensors, but people seem to begin having issues running more than 10 sensors.)
Fun fact: Apple MagSafe and Dell laptop power connectors use OneWire protocol for power and to send information about power to the computer. To connect your DS18B20, you may either use a Grove connector or your breadboard and wires. We will show both approaches side by side.
- Open the sketch
Example_05_Mayfly_DS18B20temp.ino. - Notice that you specify which pin you are using in Line 7, and the DS18B20 is currently assigned to pin 7. Your Mayfly has the pins labeled on the header rail and in the Grove ports. You can change this number to use any available digital pin on the Mayfly.
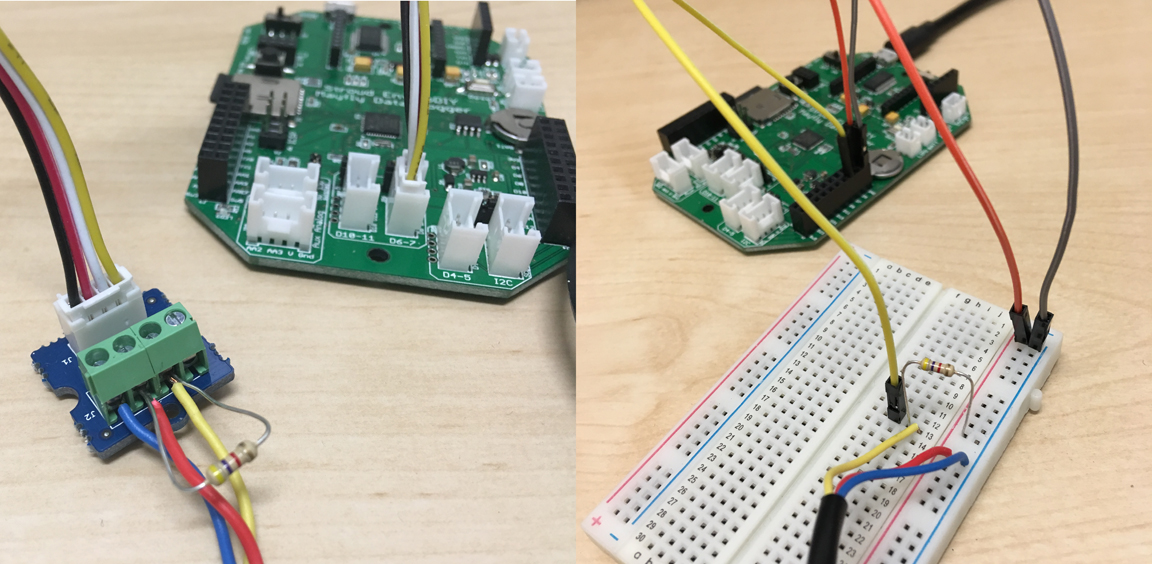
- Wire the sensor as illustrated below. If your DS18B20 has different wire colors than pictured:
- Red connects to 3-5V power (3V3 on Mayfly)
- Blue/Black connects to ground (GND on Mayfly)
- Yellow/White is data (D7 on Mayfly)
- 4.7kΩ resistor between data and power (resistors are not directional)
- Connect the Mayfly to your computer, set up
platformio.iniand do all of the steps to run the sketch. - As the sketch scrolls on your serial monitor, hold the sensor and see if you can get the temperature change.
- Open the sketch
Connect I2C sensors: BME280 temperature, pressure, and humidity and OLED display
-
I2C (Inter-Integrated Circuit) is a communication protocol that is generally used in inexpensive, short wire sensor applications, so it shows up a lot in the Arduino world. The internets say it’s pronounced I-squared-C, but I hear a lot of very smart engineers calling it I-two-C, so take your pick. This protocol communicates through two wires (SDA for data and SCL for clock). It also has a power and ground wire. There’s only one I2C port on the Mayfly because this communication protocol can support 1008 sensors over two wires. The catch for our purposes is that the sensors need to have different addresses (or “slave IDs”, where a “slave” is a sensor). The Real Time Clock on the Mayfly is an I2C device, so your addresses need to be different than the clock (the clock’s address is 0x68, and here’s a list of common addresses.
The most common instance in environmental monitoring that we have had to pay attention to I2C addresses is when using the pressure sensors that we commonly use for water pressure and air pressure (such as in combination to log water level). It turns out that the manufacturers for these sensors use the same two addresses quite commonly. The default addresses are 0x76 and 0x77 for both types of pressure sensors, but most have a way to change the address by physically soldering a jumper on the sensor breakout board. Your sketch needs to reference the correct address for each sensor.
Because I2C sensors know how to take turns sending data on the wires they share, we are able to string together several sensors. Most often with the Mayfly, we do this using an I2C hub with several Grove ports.
- Open the sketch
Example_06_Mayfly_BME280_OLED.ino. - Take note of the address for your BME280 sensor, which is probably printed in tiny characters on the breakout board (0x77 is Adafruit default; 0x76 is Grove default). Make sure line 32 in the sketch has the correct address for your sensor.
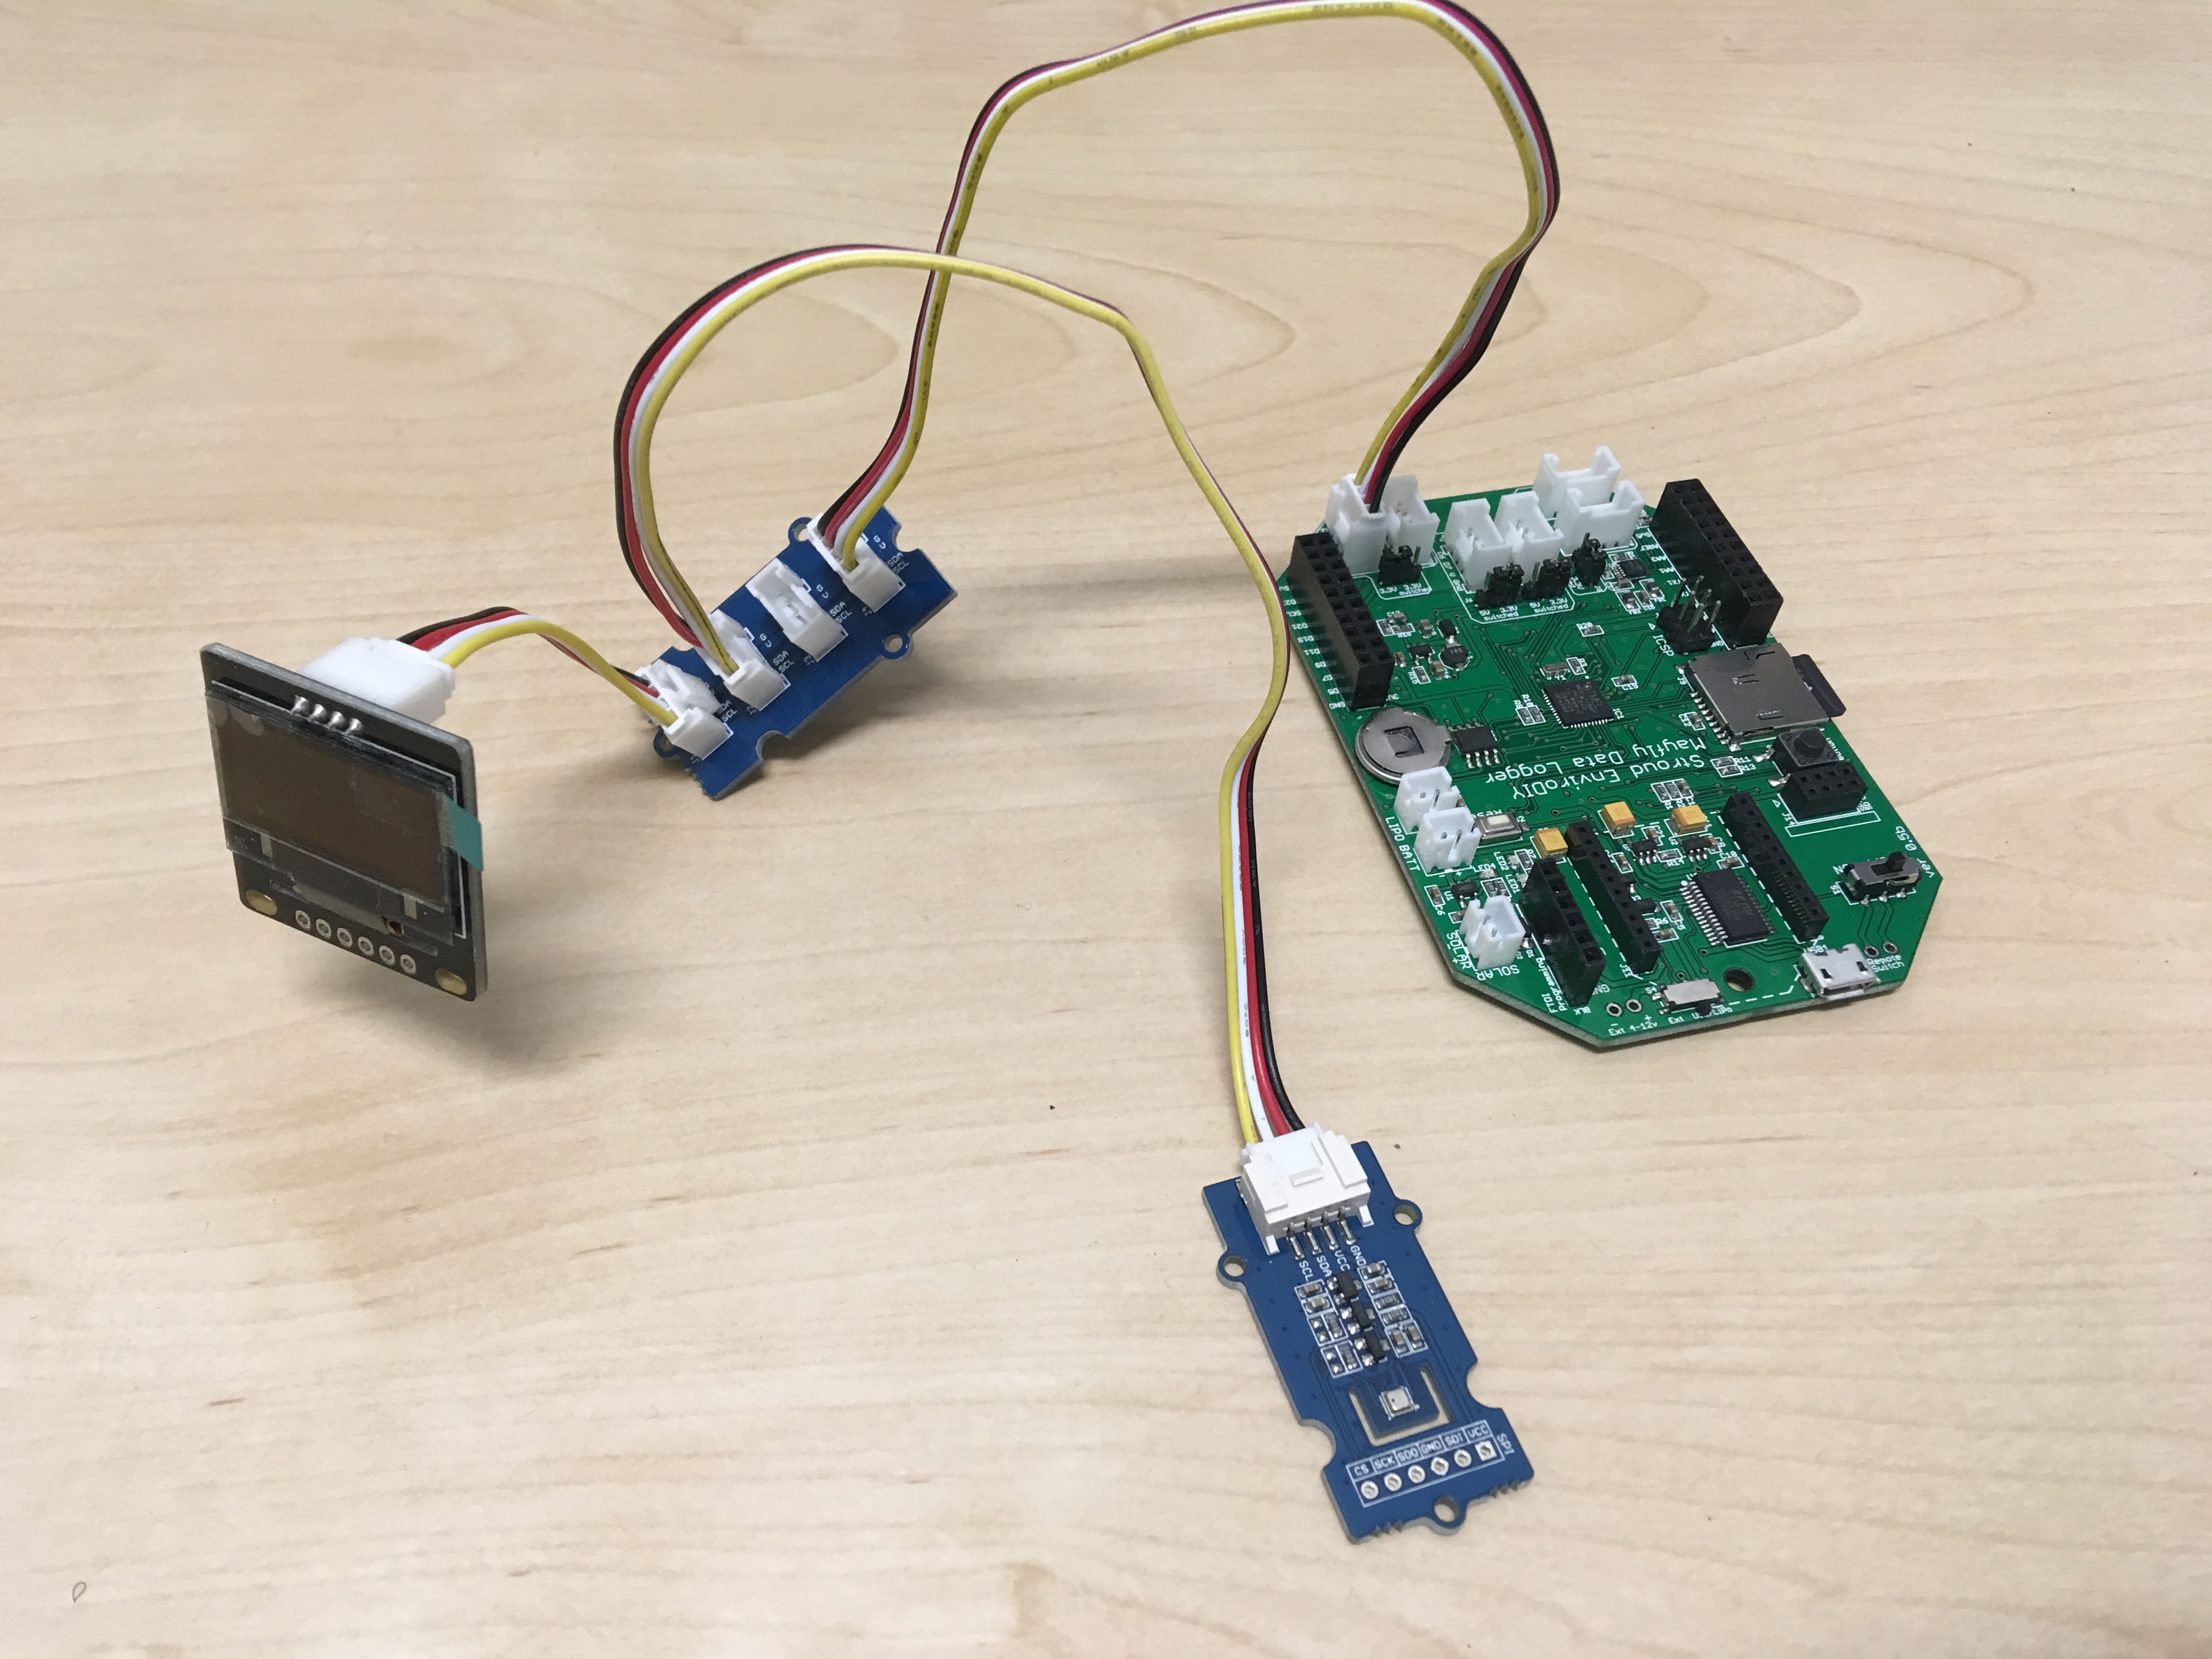
- Wire the sensors as illustrated below. Note, we are not offering a breadboard variation because the OLED (which is optional in the sketch) only has Grove connection available because the other holes on the board are for mounting and contain no digital connections (true at least for the SwitchDoctor OLED).
- Connect the Mayfly to your computer, set up
platformio.iniby adding the following address in the ‘lib_deps’:https://github.com/switchdoclabs/SDL_Arduino_SSD1306.git - Do all of the steps to run the sketch.
- As the sketch scrolls on your serial monitor and/or OLED display, hold the sensor or blow on it and see if you can get the temperature and humidity to change.
- Open the sketch
Extras
- There are several additional example sketches in the extras folder that you may try if you have the sensors.
If you are able to edit and run sketches using PlatformIO and upload them to the Mayfly, you are ready for Part 2 (Episodes 8-13), where we begin to use the Modular Sensors library.
Key Points
Translate additional skills from earlier tutorials using Arduino UNO + Arduino IDE to PlatformIO IDE + EnviroDIY Mayfly logger.