Arduino Basics for EnviroDIY
Overview
Teaching: 0 min
Exercises: 120 minQuestions
What are the parts of an Arduino board?
How do I create, upload and modify an Arduino code sketch?
Objectives
Learn basic Arduino skills, including uploading, running, and modifying sketches.
Prerequisites
- A computer, an internet connection, and motivation to tinker and hack.
- For this episode, you’ll need an EnviroDIY Mayfly Data Logger Board, a micro-USB cable rated for data, and a CR1220 Lithium Coin Cell 3V Battery.
- If you are interested in extra tinkering, you may do the full online tutorials, but you will need either an Arduino Uno Starter Kit, an Adafruit Metro 328 Starter Pack, a Sparkfun RedBoard Tinker Kit or any Arduino-compatible micro-controller board along with other listed accessories.
In Part 1: Arduino and IoT for EnviroDIY, we introduce you to general skills to prepare you for using ModularSensors for environmental monitoring. We do this largely by leveraging interactive online tutorials that are not directly related to environmental monitoring. We have intentionally chosen this approach to acquaint users to the broader world of Arduino-framework micro-controllers.
Actively Participate
We strongly recommend that you actively participate in the activities in each tutorial because you will need to be comfortable with both physical connectivity to an Arduino and code edits prior to using EnviroDIY Modular Sensors Library.
Episode 1: Arduino Basics for EnviroDIY
The Arduino sketches in this episode are simple and require a minimal number of libraries to run. We include a short note for each tutorial to help users know how elements of the tutorial will apply to their use of EnviroDIY Modular Sensors for environmental monitoring and to modify the sketch for use with the EnviroDIY Mayfly.
Ladyada’s Learn Arduino by Limor Fried, lessons 0-2
- Lesson 0: A Tour of Arduino.
- Walks through the anatomy of an Arduino board and how to install the Arduino software. (Skip the part about Codebender software.) Even though you aren’t using the Uno, please read through the tutorial.
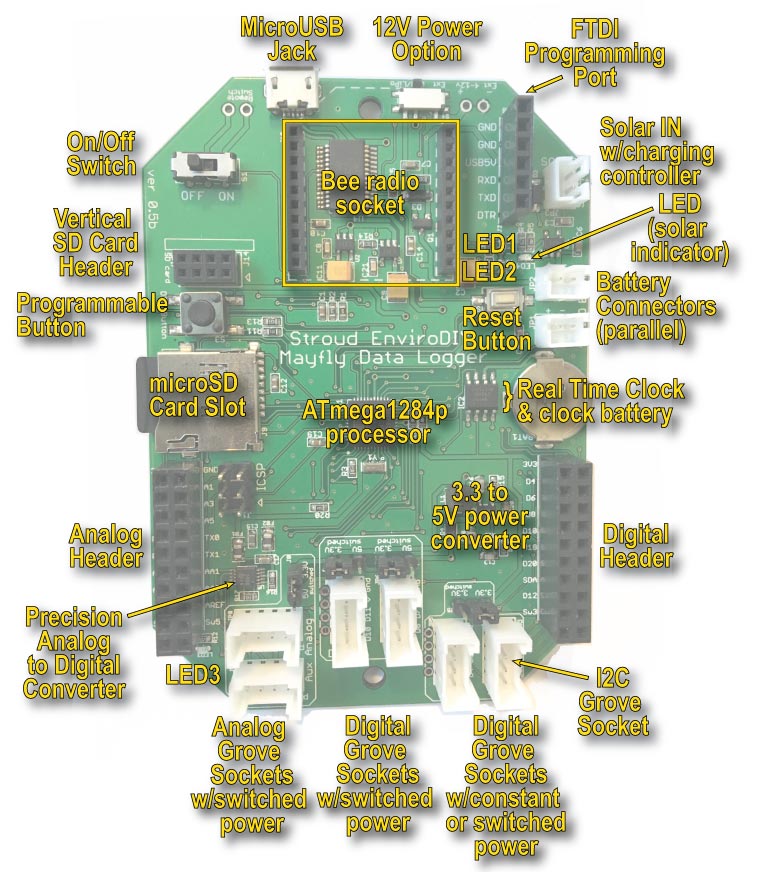
- Note that the tutorial uses the Arduino Uno because it’s a “starter Arduino.” That is not going to support your needs for environmental monitoring. Without getting into too much of the history, the EnviroDIY Mayfly was designed specifically to meet the needs of environmental monitoring, based on a board that worked well but was discontinued. Compared with the Uno, the Mayfly has 4x more flash memory, 8x more RAM, a microSD card slot for storing data, a real time clock to maintain logging intervals, the ability to supply 3.3V or 5V of power to sensors, tons of pins to connect sensors, a socket that is built to interface with the common Arduino-compatible radios (Bee) for logging over WiFi or cellular networks, extremely low power requirements, and a built-in solar charging controller (if you connect a solar panel, the Mayfly will automatically charge a connected LiPo battery). If you want more details about the Mayfly, you can find them at EnviroDIY.org.
-
This is the Mayfly v0.5b, which was in production from 2016-2022.
-
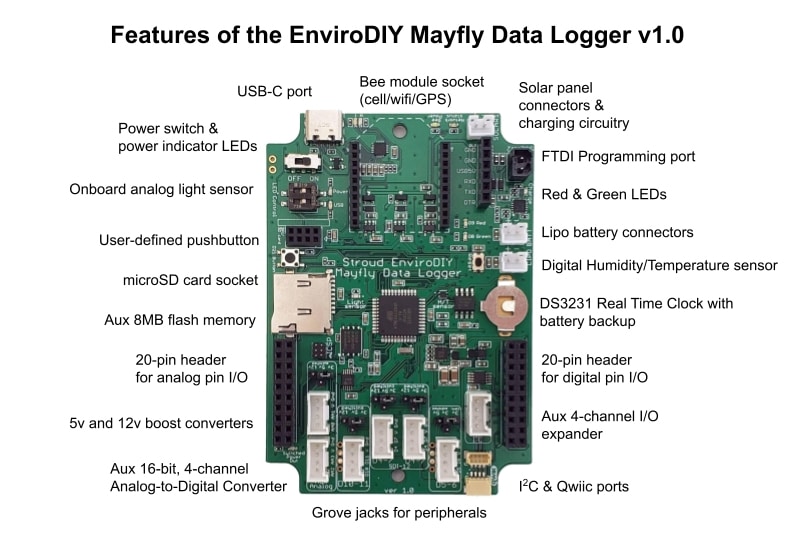
This is the Mayfly v1.0, which was released in early 2022. Details of the changes between board versions can be found at EnviroDIY.org. You will need to note some pin and LED location differnces to complete this tutorial.
- A note on the USB fuse on the Uno. The Mayfly does not not have this, which means that it is possible to “fry” the Mayfly more easily than the Uno. Make sure the toggle that we have labeled “12V power option” is on USB/LiPo for the tutorials and for almost everything you will do with the Mayfly. Supplying 12V power is an advanced maneuver that requires extra hardware.
- After you work through Lady Ada’s software download instructions, follow the instructions for installing the Mayfly driver.
- NOTE for Installing Arduino Desktop IDE for Windows: If your IDE does not recognize a COM port for your board, you may need to follow these instructions to install the board drivers. This might happen if you installed from the Windows Zip package. If you used the Windows Installer (admin privileges required), then the drivers should have installed automatically.
- Lesson 1: Upload your First Sketch
- Walks you through uploading your first program, which is called a “sketch” in Arduino.
- Select Board Type: Instead of the Ardunio Uno, select “EnviroDIY Mayfly 1284p”.
- If the Mayfly is not listed as an option, you missed this step in Lesson 0: Instructions for installing the Mayfly driver.
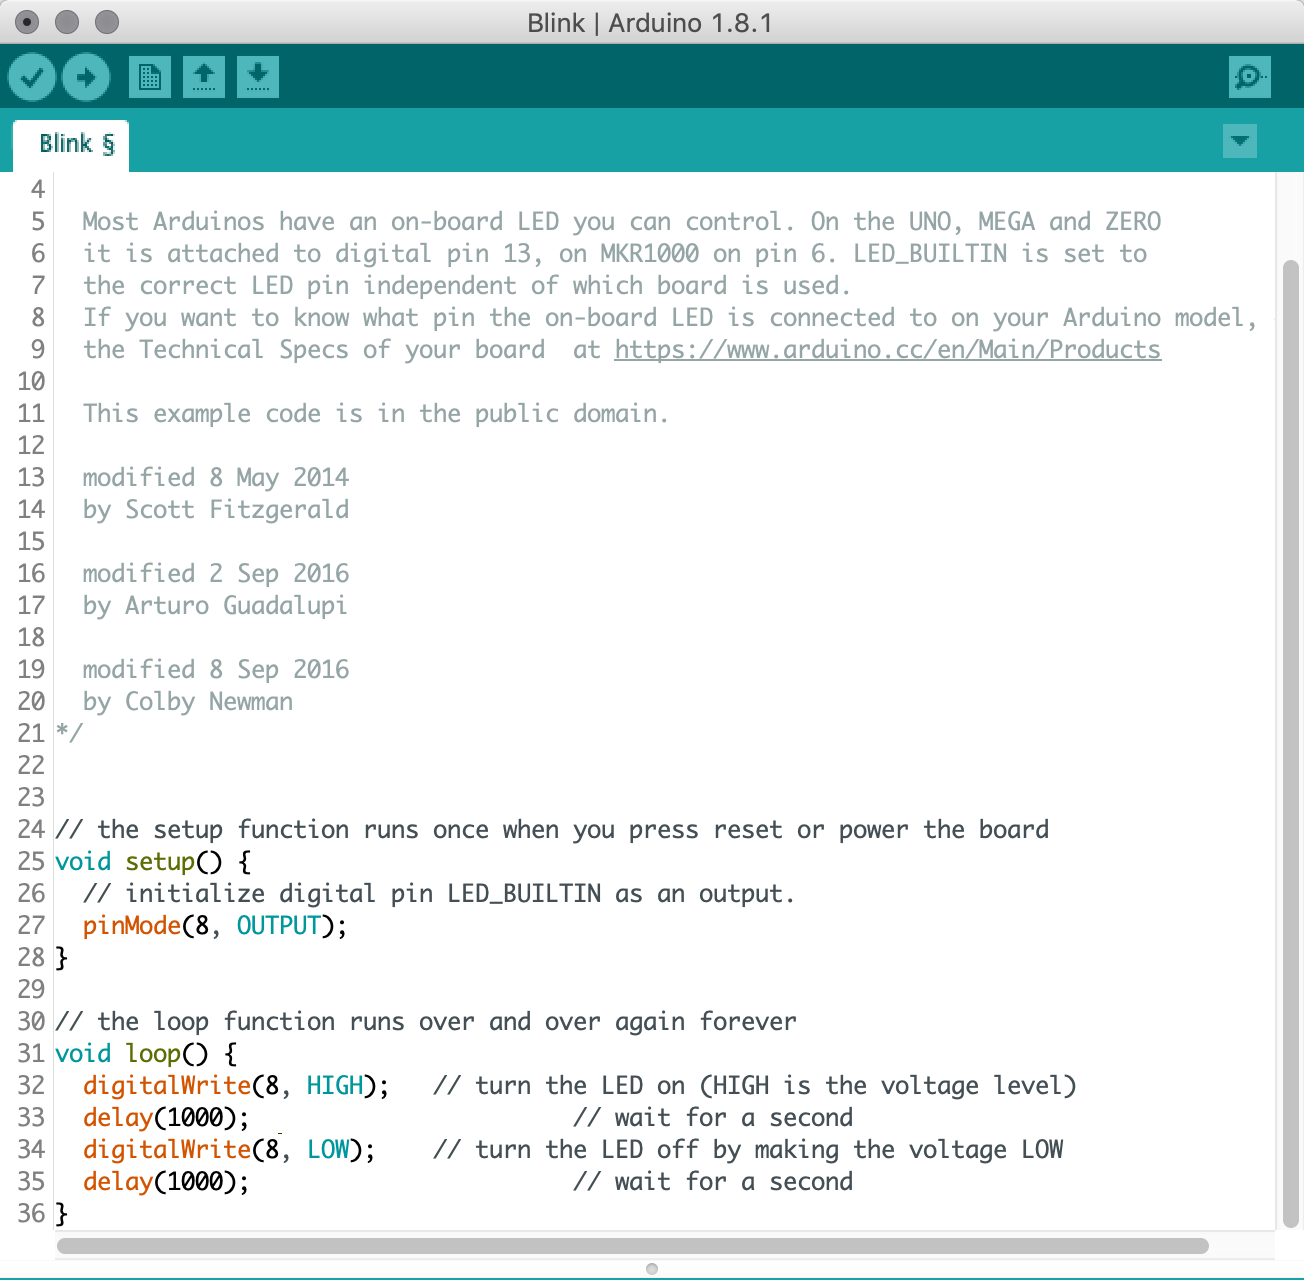
- You will need to edit the Blink sketch for the Mayfly. As shown in the image below, replace all three instances of
LED_BUILTINwith8to use the green LED2 on the Mayfly’s pin number 8.
- Lesson 2: The Parts of Sketch
- The anatomy of an Arduino sketch and how to change a sketch. Taking an existing sketch and chaning it to work for your sensors and pins and ports is the core of what you will do with EnviroDIY Modular Sensors.
The Serial Monitor
- In environmental monitoring, we use the serial monitor all the time to test sensors before deployment. Modify your Blink sketch with the code below to send information to the serial monitor to describe what actions are happening on the Mayfly.
// the setup function runs once when you press reset or power the board
void setup() {
  // initialize digital pin 8 as an output.
  pinMode(8, OUTPUT);

  // initialize a serial port
  Serial.begin(9600);
  // print a header line to the serial port
  Serial.println("This is the output of the Blink Arduino sketch.");
}

// the loop function runs over and over again forever
void loop() {
  digitalWrite(8, HIGH);   // turn the LED on (HIGH is the voltage level)
  Serial.println("The LED is on."); // print a message to the serial port
  delay(1000);              // wait for a second

  digitalWrite(8, LOW);    // turn the LED off by making the voltage LOW
  Serial.println("The LED is off.");
  delay(1000);              // wait for a second
}
- After you edit the blink sketch, verify/compile and upload the sketch to your Mayfly.
- Click on the “Serial Monitor” button located at the top, right corner of your Arduino window. It looks like a magnifying glass.
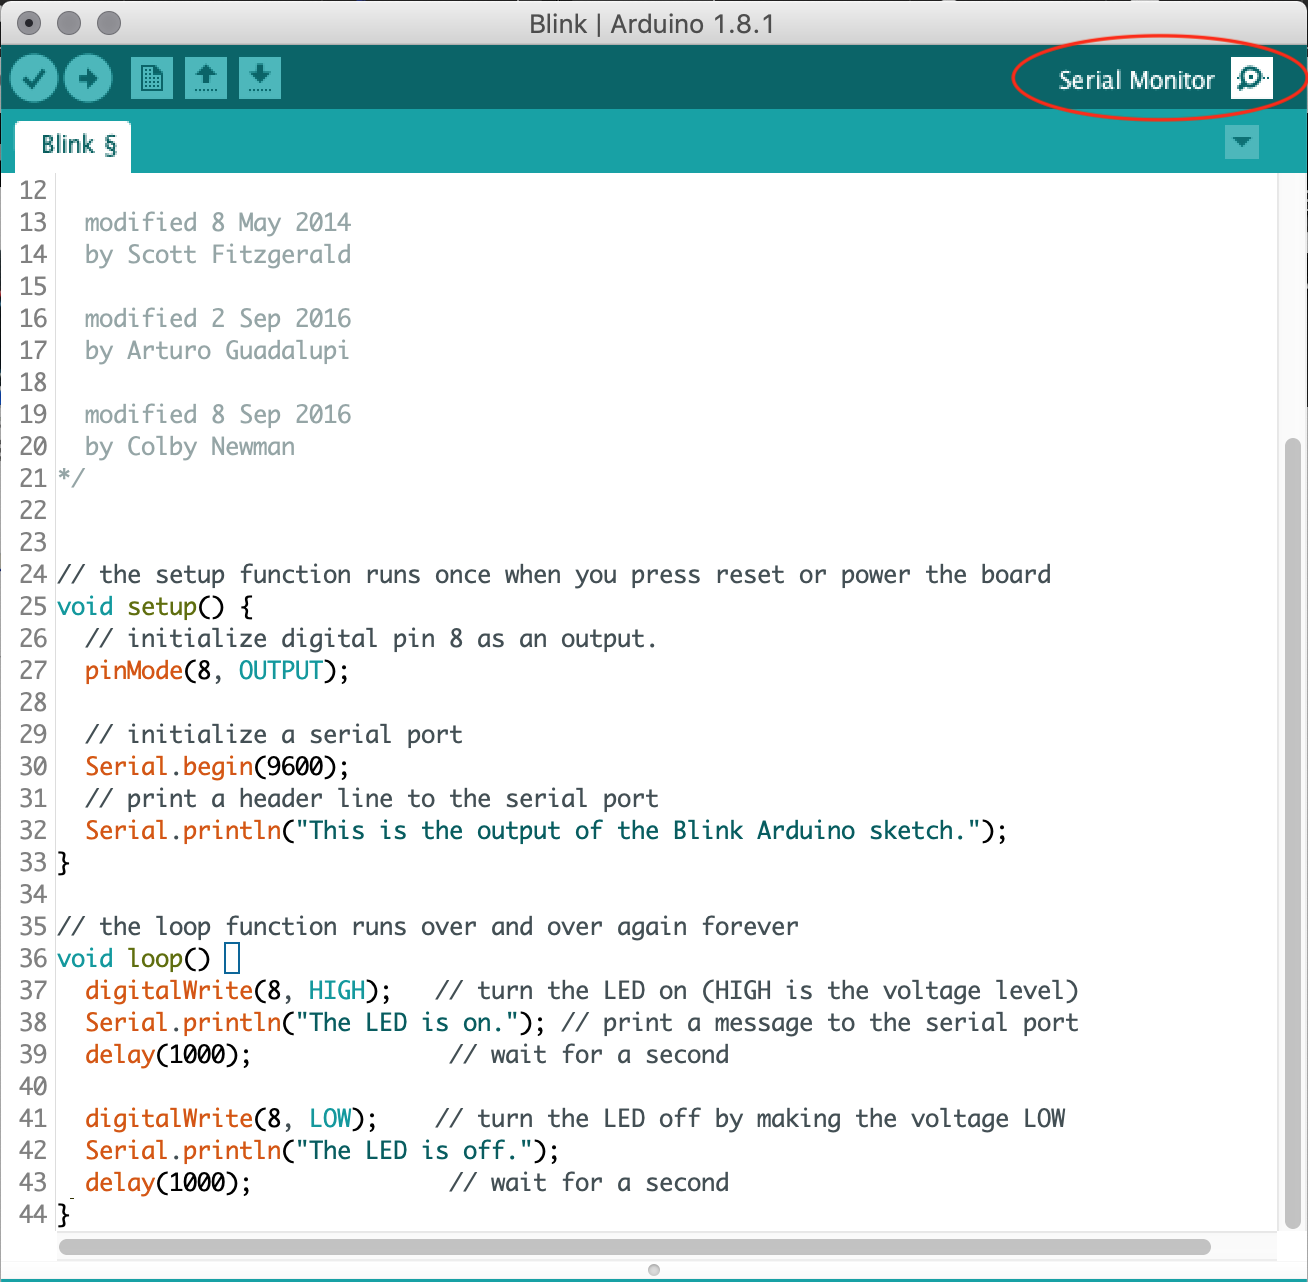
- Select the baud rate of 9600 for this sketch. This rate will vary, but you will find it in the sketch:
Serial.begin(9600). If you have the incorrect number in the serial monitor, the output will contain a stream of nonsense.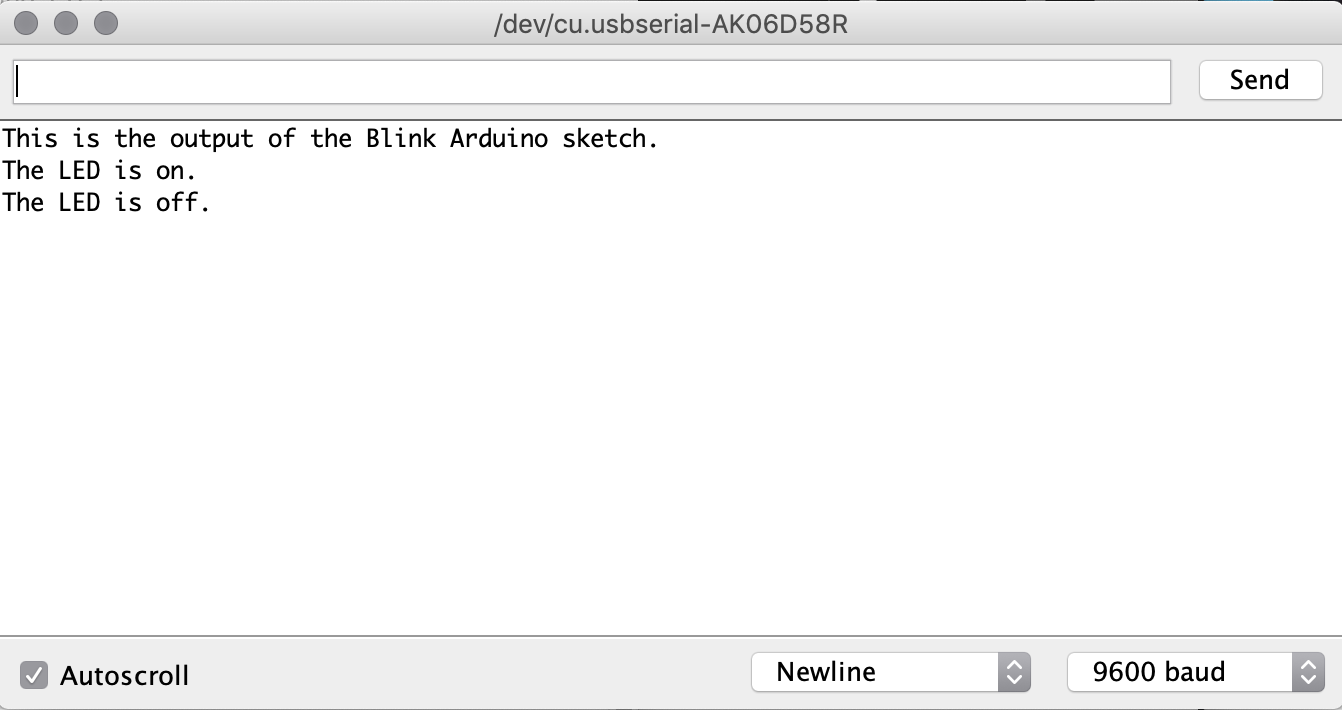
Adafruit Learn Arduino by Simon Monk, lessons 0 and 2
NOTE: Please read through the two lessons to learn how breadboards and resistors work. To participate fully in this tutorial, you will need additional parts, but this is optional. The additional parts include a breadboard, resistors, LED lights, and jumper wires, such as those included with either an Arduino Uno Starter Kit, an Adafruit Metro 328 Starter Pack, or a Sparkfun RedBoard Tinker Kit.
- Arduino Lesson 0. Getting Started
- A look at all the parts of the starter kit. Describes a breadboard anatomy. (You might use breadboards to test sensor wiring prior to soldering for your deployments.) Repeats how to install Arduino software, so you can skip that part.
- Arduino Lesson 2. LEDs
- Uses resistors to change the brightness of an LED light by utilizing a breadboard. Important for understanding resistors, which are required for many environmental sensors. Introduces you to the different pins on the Arduino board. Understanding pins will be important for connecting environmental sensors.
Complement your Learning (Optional)
- Open the SparkFun Inventor’s Kit (SIK) Guide v3.3 booklet (or whatever booklet might have come with your starter kit) for helpful diagrams, explanations and tips.
- Consult the official Arduino Language Reference, the Variables Tutorial, or the Functions Tutorial if you have an additional question about any elements of the code you are exploring.
- Explore other online resources, such as Sparkfun’s SIK Experiment Guide for Arduino - V3.3, for alternate presentations of Arduino basics.
Key Points
Arduino-framework microcontroller boards are designed to be programed to interact with the real world.
An Arduino code sketch has comments, statements and functions organized into two main blocks, the
setup()function block and theloop()function block.An Arduino has different pins, which are designated for analog or digital inputs and outputs.
The Serial Monitor allows you to view outputs that you send from your Arduino.