Using PlatformIO and Mayfly
Overview
Teaching: 0 min
Exercises: 90 minQuestions
How do I tell PlatformIO which Arduino I am using?
How do I use PlatformIO to upload a sketch to an Arduino board?
How do I view and edit sketches in PlatformIO?
Objectives
Install Mayfly data logger in PlatformIO.
Edit and upload sketches to Mayfly.
Prerequisites
- A computer, an internet connection, and motivation to tinker and hack.
- For this episode, you’ll need an EnviroDIY Mayfly Starter Kit, and a CR1220 Lithium Coin Cell 3V Battery (also available where watch batteries are sold).
Episode 5: Using PlatformIO
In this lesson we will interactively explore the features of PlatformIO and increase your readiness for Part 2 (Episodes 8-13), where we begin using the EnviroDIY Modular Sensors sketches to run multiple environmental sensors in a manner that is energy efficient and that can send data to an internet repository.
Get Mayfly running in PlatformIO
In PlatformIO, click the Home button and in the PlatformIO Home tab, select Boards, and in the search bar search for “Mayfly” or “EnviroDIY”. Good news! The Mayfly is among the more than 800 boards supported by PlatformIO.
You did not really need to go find the Mayfly, but we lead you there because we want you to see the columns next to the Mayfly. Notice that the Mayfly’s platform is “Atmel AVR” and the framework is “Arduino.” These are important pieces of information that you will need to include in your platformio.ini file so you can upload code to the Mayfly. If you are using a different microcontroller for this tutorial, you will need to use this information to customize the platformio.ini file to give correct upload instructions for your board.
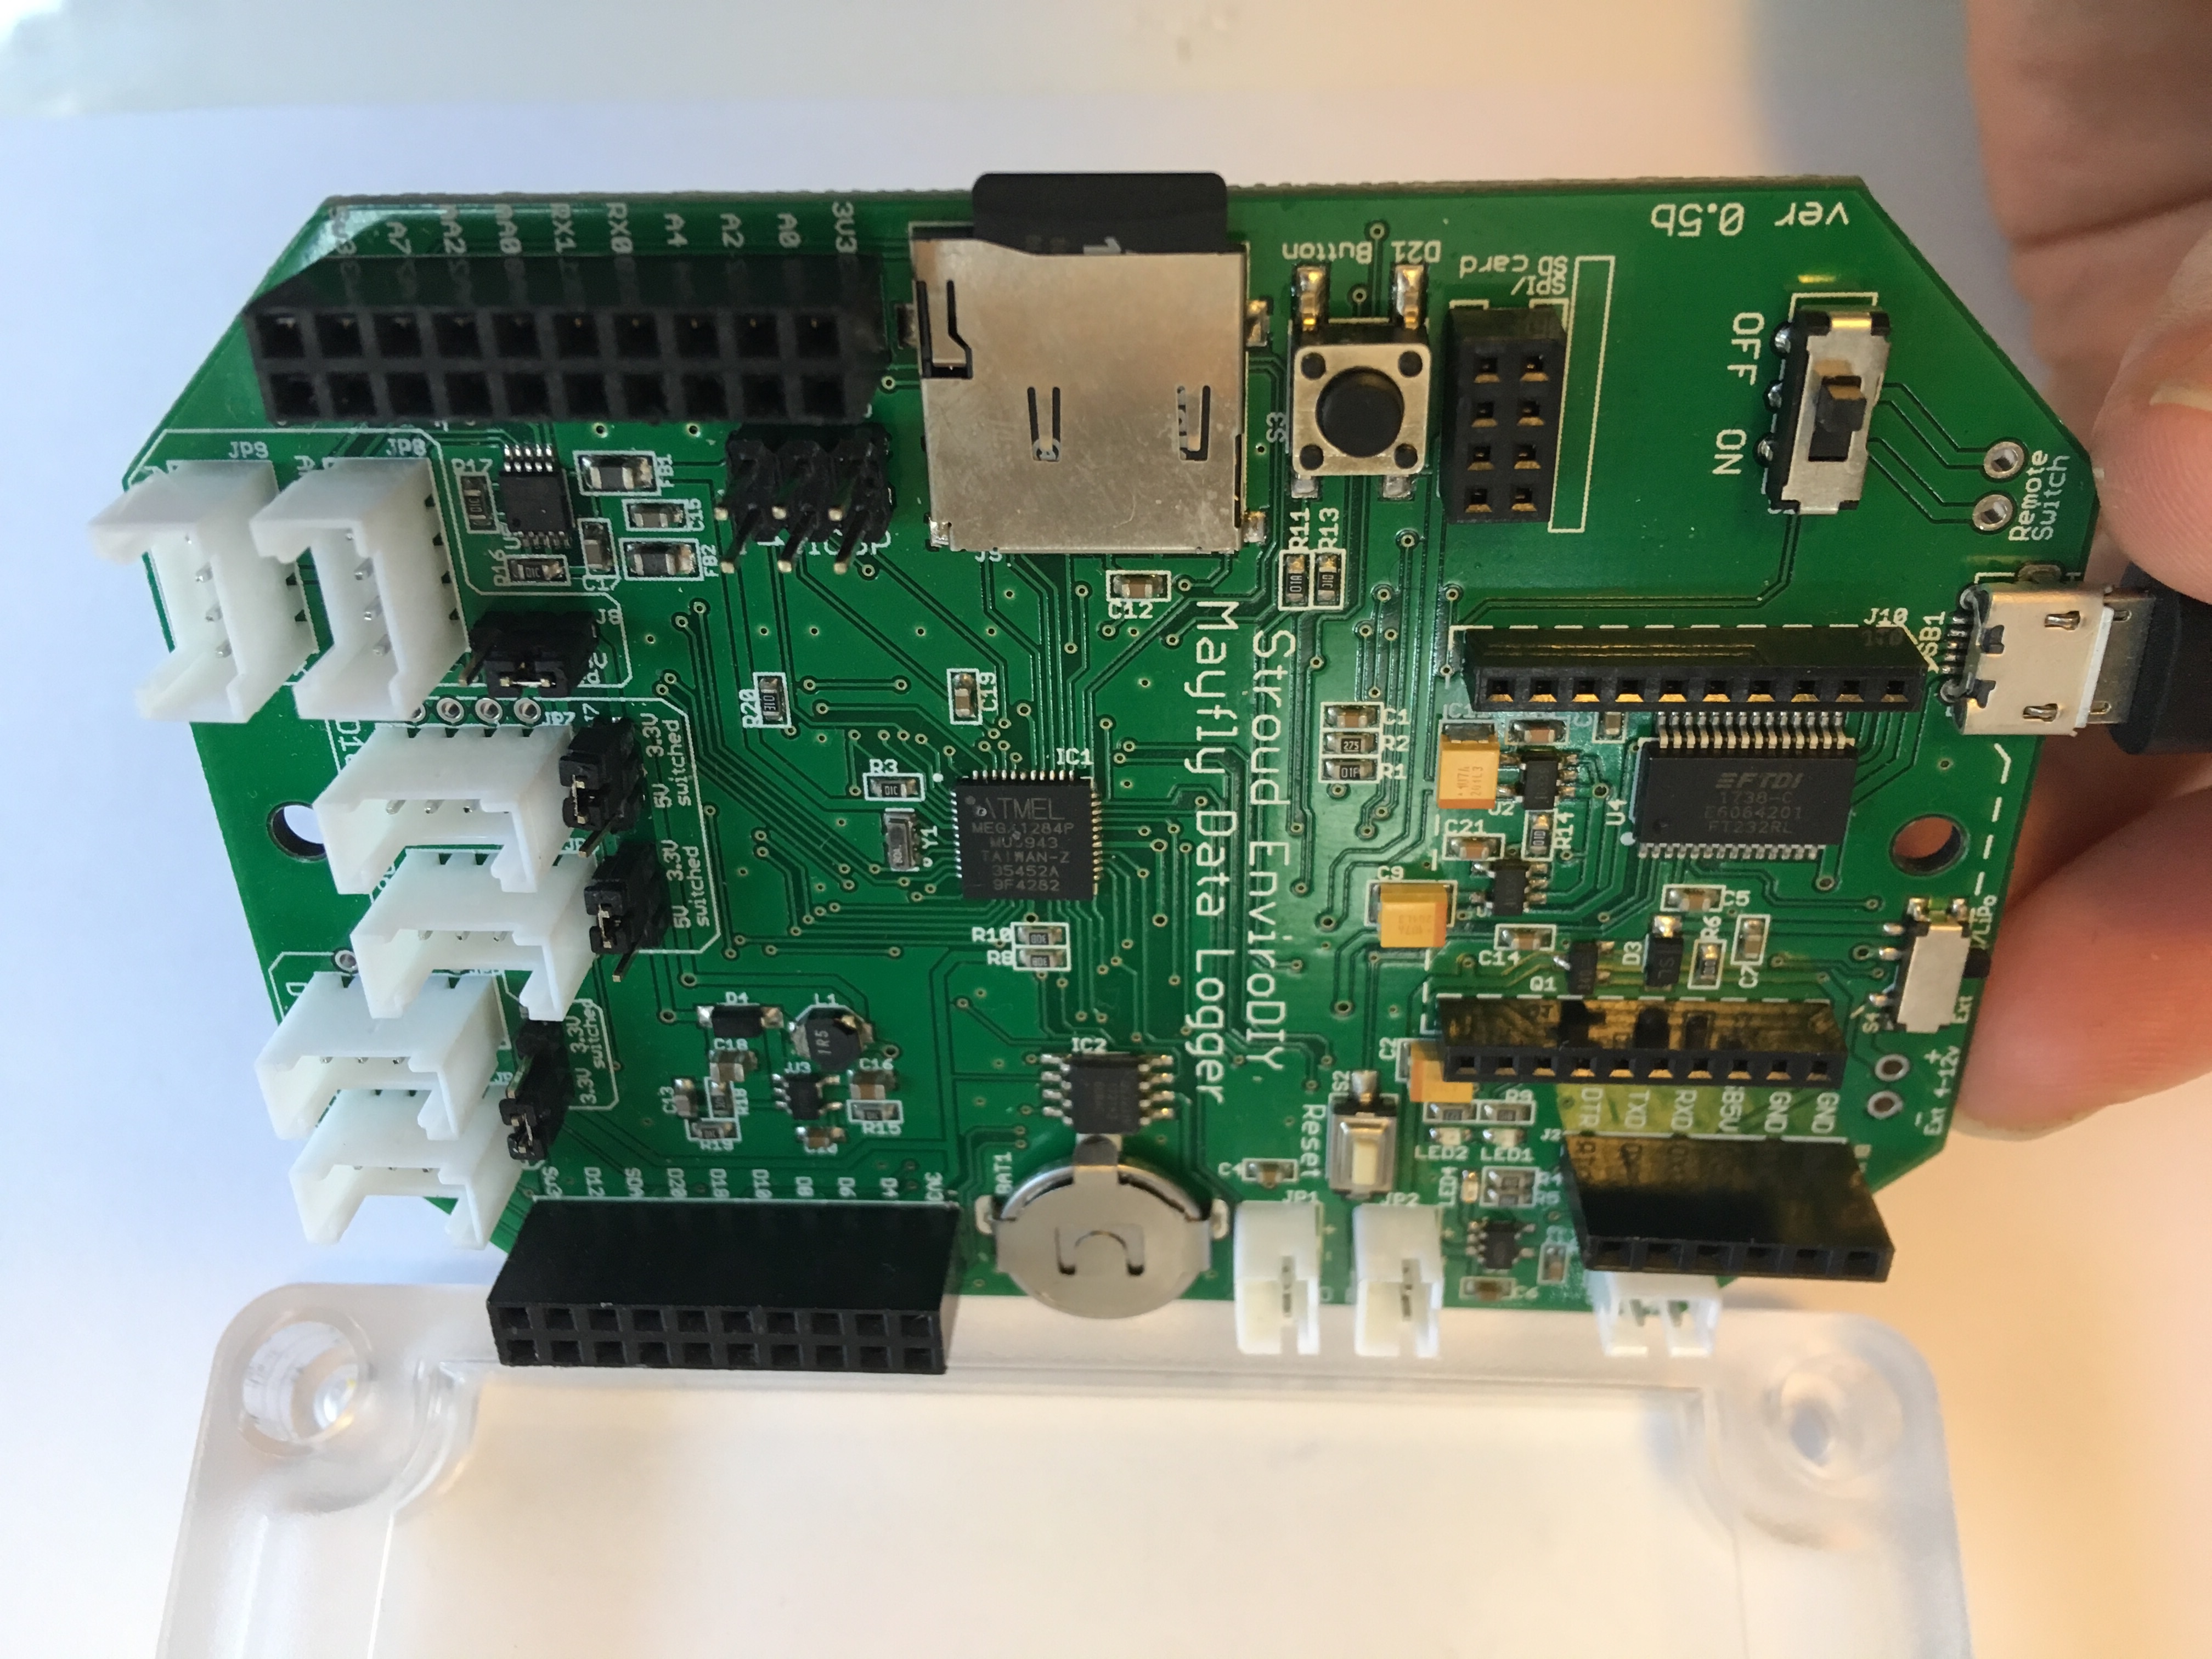
Get to know the Mayfly
Many of the Sketches in the EnviroDIY library will not work if the Mayfly is missing an SD card. While we are getting familiar with its ports and connections, let’s take a moment to insert a CR1220 coin battery and SD card into the Mayfly. The coin battery keeps the Real Time Clock running on the Mayfly, which we will set at the end of this episode. You will need a separate, external LiPo battery to supply power to the Mayfly and sensors. For the sake of this tutorial and testing, your USB connection will also supply power to sensors.
To insert the coin battery, make sure the positive (+) side of the battery is facing upward as shown below. (Caution: if you insert the battery upside-down you might ruin the Real Time Clock, dpending on the version of the Mayfly).
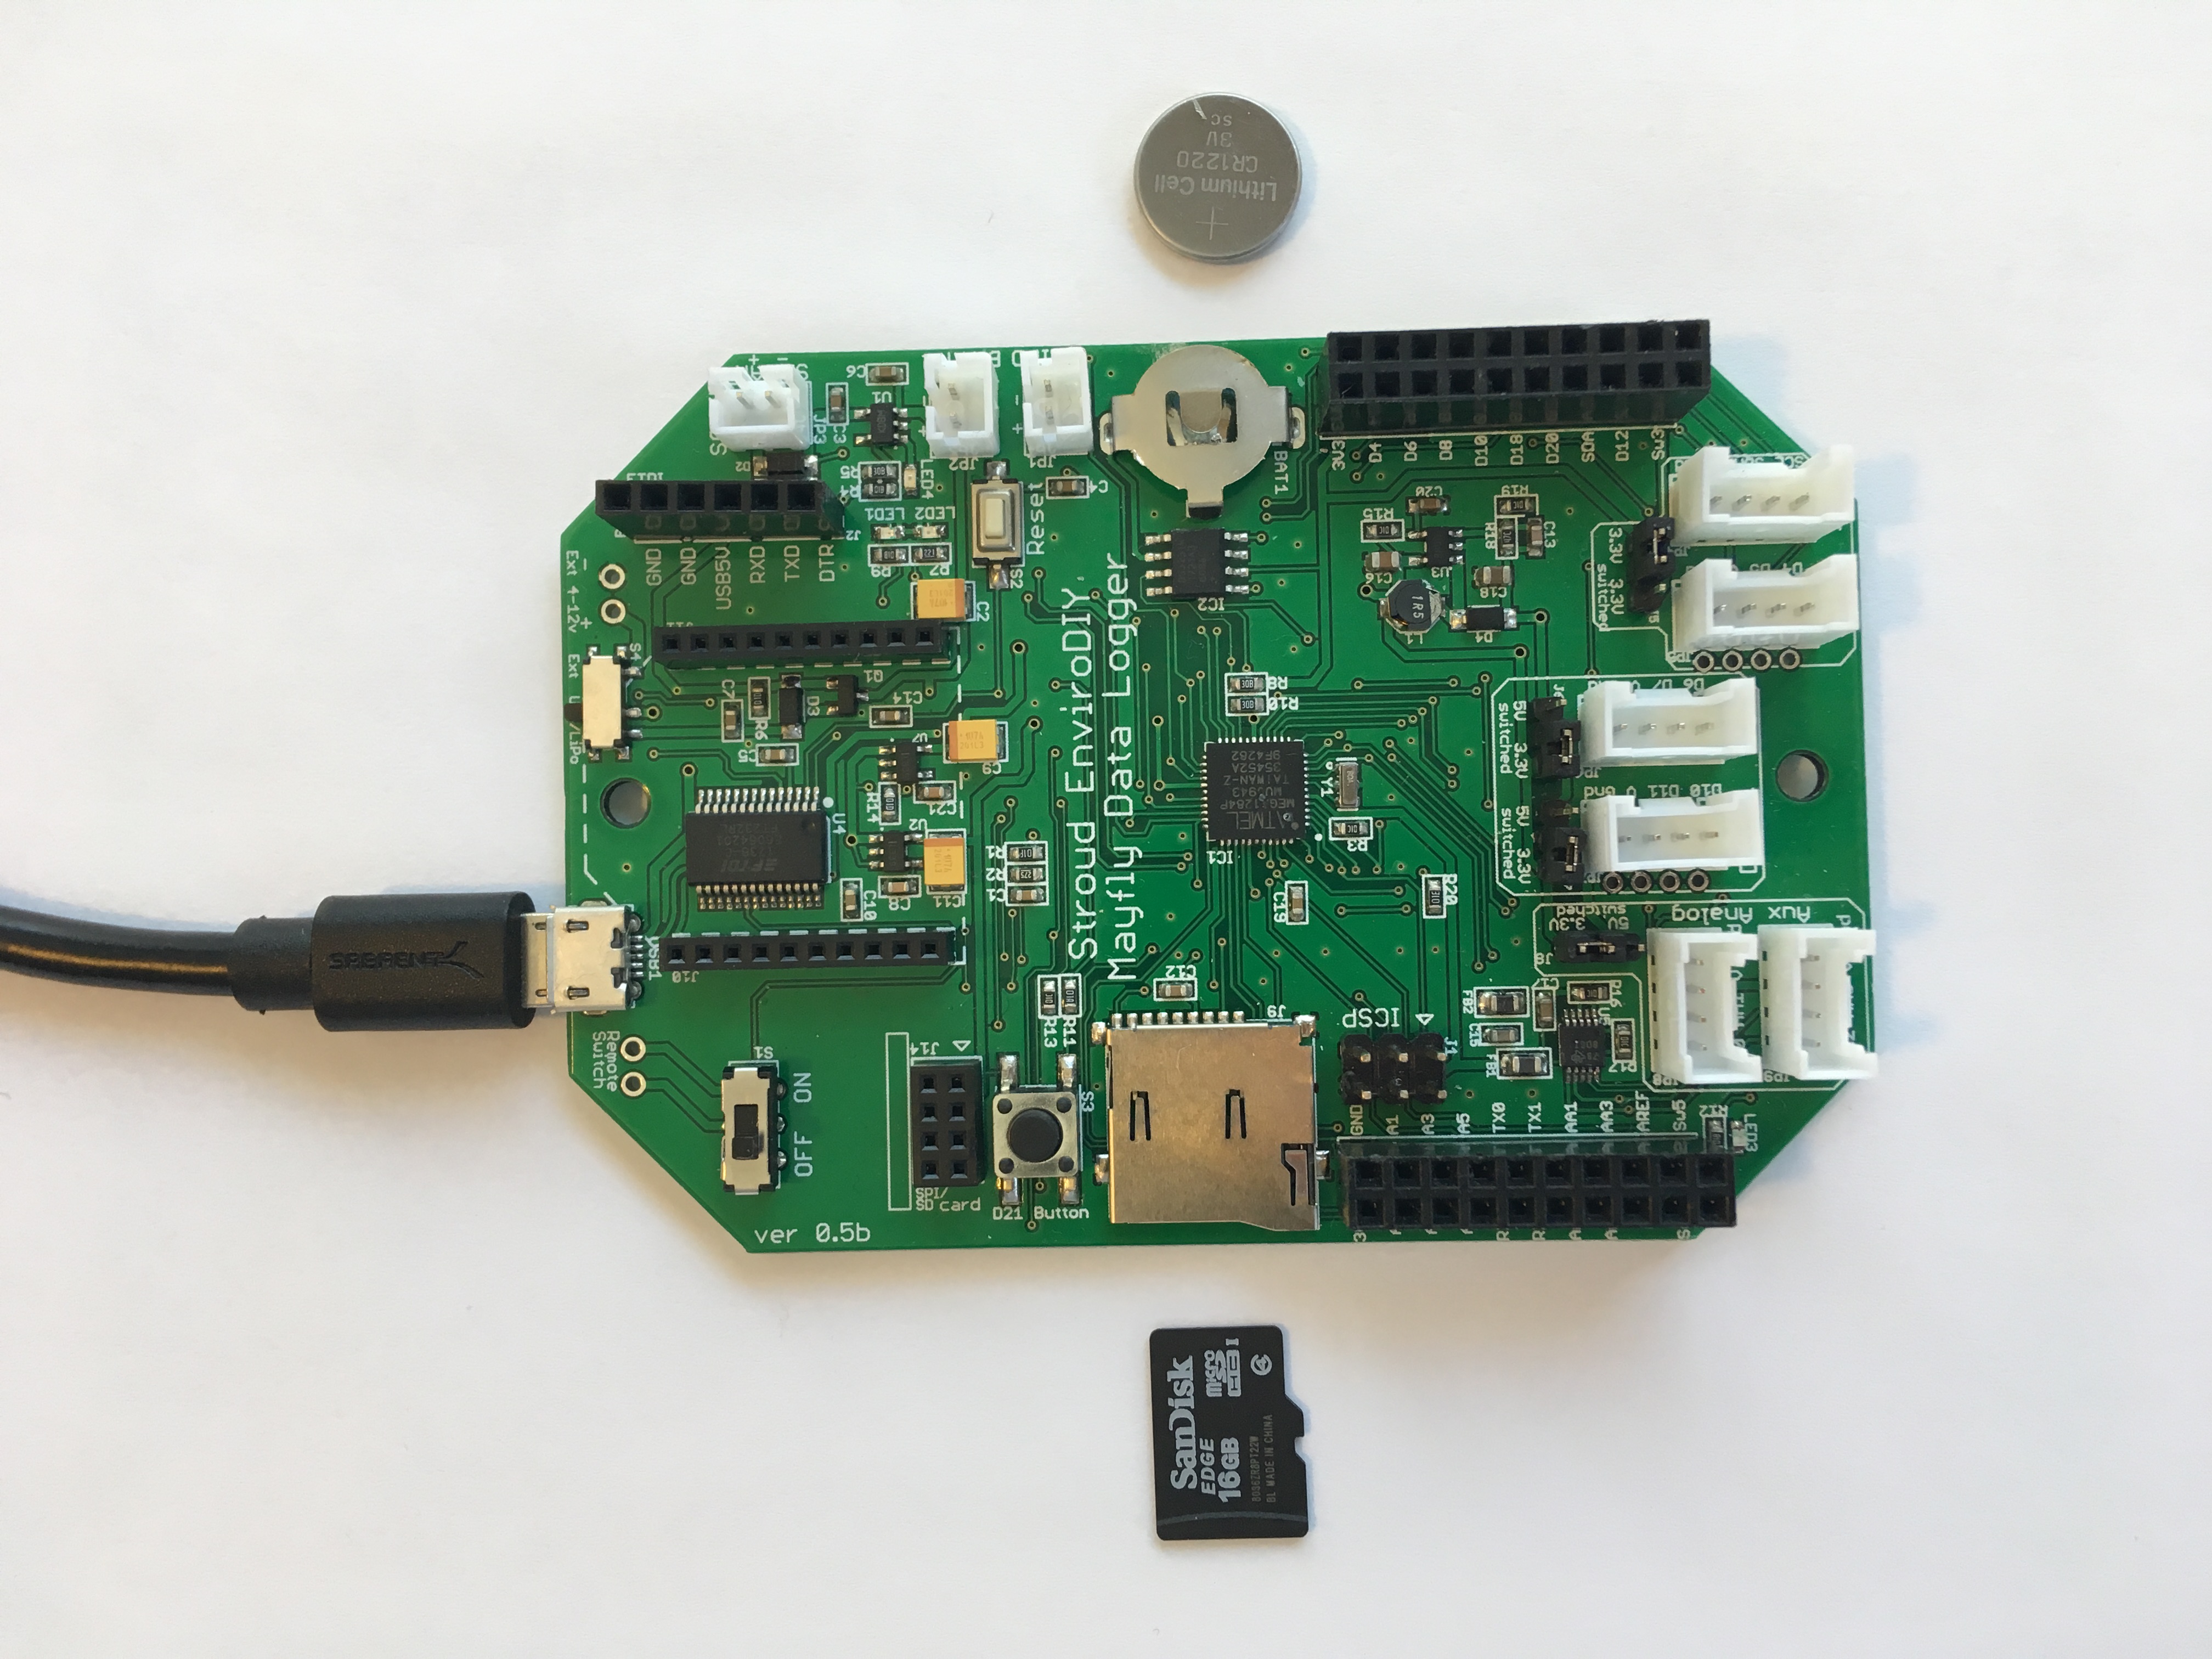
Press the battery securely (and carefully) into the slot on the Mayfly. The fit is intentionally tight, and inserting the battery is somewhat difficult to do. If you need extra leverage, using the edge of a hard plastic item might give you what you need to push the battery into the slot (but don’t push too far!). The good news is that you will not have to do this again for years.
Inserting the SD card is much easier. Orient the card into the SD card slot as shown above and it will set itself with a click. To remove, push the SD card deeper into the slot (gently), and the spring mechanism will release or eject the card.
Create a project of Episode 5 sketches
Download Sketches for Episode 5 You have a few ways to use an existing GitHub repository (repo from now on), including to fork, clone, or download the full repository of files. The typical GitHub behavior is that downloading individual files or folders within a repo is possible but difficult. Let’s pause for a moment and find out what each of those actions means. (Note, we recommend download the repo for this tutorial.)
GitHub Jargon
Fork: If you want to take an existing repo and modify it for your purposes, you could fork the repo. That sounds a lot like copying someone else’s work, but in the GitHub and open-source world, this is permitted and encouraged. Forking through GitHub retains attribution and authorship. For example, if you look at the documentation for this tutorial, you will see that we are using a repository designed by Software Carpentry.
If you want to make improvements to someone else’s repo, you can fork the repo, make your edits, and then do a pull request to share it with the owners of the repository, to offer that they pull it back into their repository. This type of skills sharing is one of the more powerful aspects of the open source world.
Clone: This approach gives you direct access to a repository, and makes the most sense if you have access to contribute to the repository. When we clone a repository, our Git software (e.g. GitHub Desktop) will track the history and changes of the repo and allow you to fetch those changes and directly update the files stored on your computer in your project. If you have access to contribute, you can also push your changes to the repo.
Download: This approach allows you to download and use files from a repo. It will not track changes or allow you to contribute to the repo, but you may edit the files as much as you like. For the purpose of this tutorial, downloading the repo is the best option.
Load your first sketch from PlatformIO!
-
Step 1: Before you download the repo, we recommend that you make a folder dedicated to Arduino, if you haven’t already. Locate it somewhere convenient to your file management structure (mine is ~Documents/Arduino/…).
-
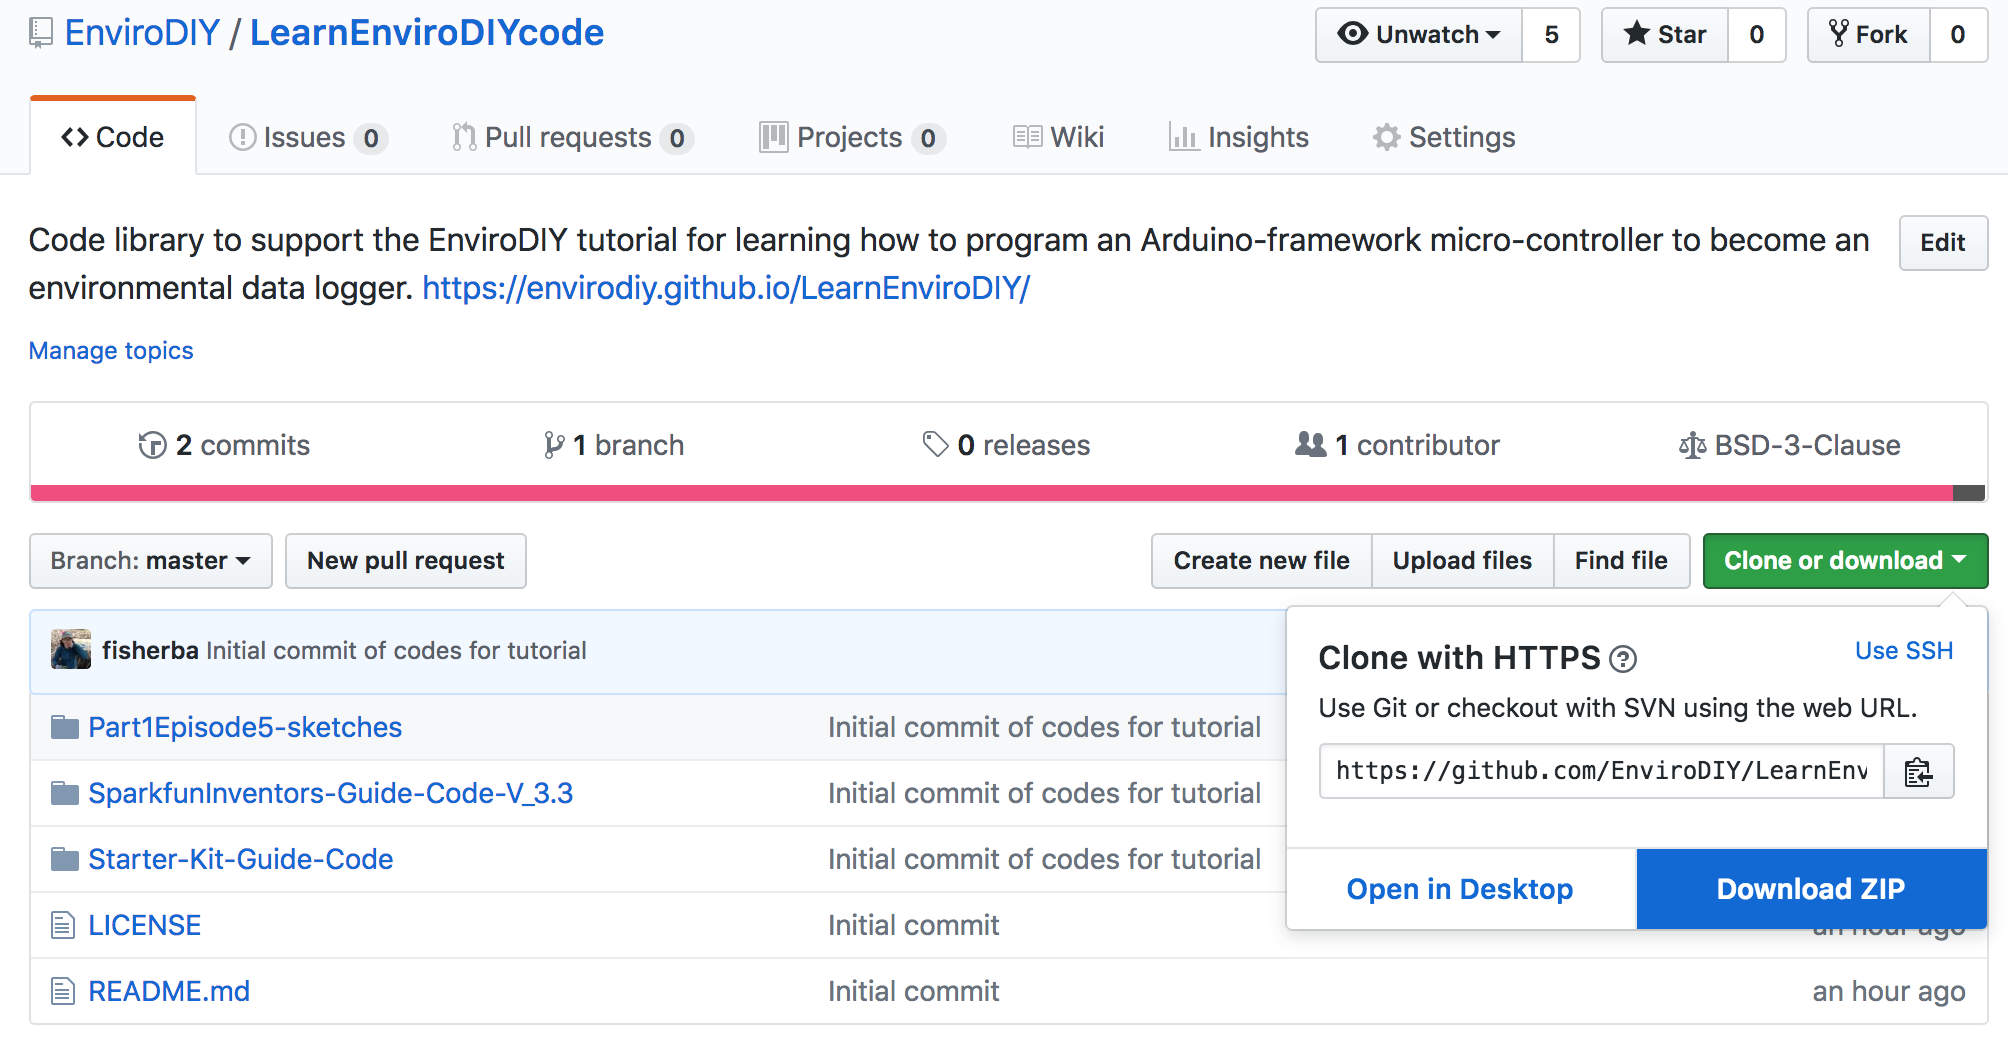
Step 2: We made a dedicated repository for this learning tutorial called LearnEnviroDIYcode. Go to this GitHub site and click on the green “Clone or Download” button (see below). Select the “Download ZIP” option and save the file in your dedicated Arduino directory. Finally, unzip the download and you will notice that it contains a few directories, including codes for the Arduino Starter Kit for Episodes 1&2, and more.
-
Step 3: In PlatformIO, add the unzipped directory as a “Project” by going to Home, Projects, Import Arduino Project… and select your LearnEnviroDIYcode directory. Find this new directory in VSCode Explorer. In the directory “Part1-sketches,” notice that each sketch includes a folder that is named identically to the .ino file Ardunio sketch. This structure is required in PlatformIO, just like it was in the Arudino IDE.
-
Step 4: Open Example_01_Mayfly_blink.ino, and examine the code. It should look extremely familiar to the very first sketch from Ladyada’s lesson 1. We changed the pin number in the sketch to match one of the LED options on the Mayfly. Although many Arduino framework boards have compatible functionality, the ports and lights are usually not located at the same pin numbers. Most have documentation to help you locate the pin numbers. Documentation for the Mayfly is compiled at envirodiy.org..
C++ IntelliSense error message
Error: If you get an pop-up error message instructing you to convert your .INO sketch into a .CPP file, you can select “Do not show again.” PlatformIO will successfully auto-convert and Build .INO files if the file includes
#include <Arduino.h>at the beginning of the sketch.
- Step 5: Open
platformio.inifile located in the LearnEnviroDIYcode directory. Confirm that “LearnEnviroDIYcode” is the name of the active directory (in The Bar of EVERYTHING at the bottom of the VSCode window).
About the
platformio.inifileThis is an “initialization” file (the community calls it the “ini” file, pronounced like an innie belly button). The
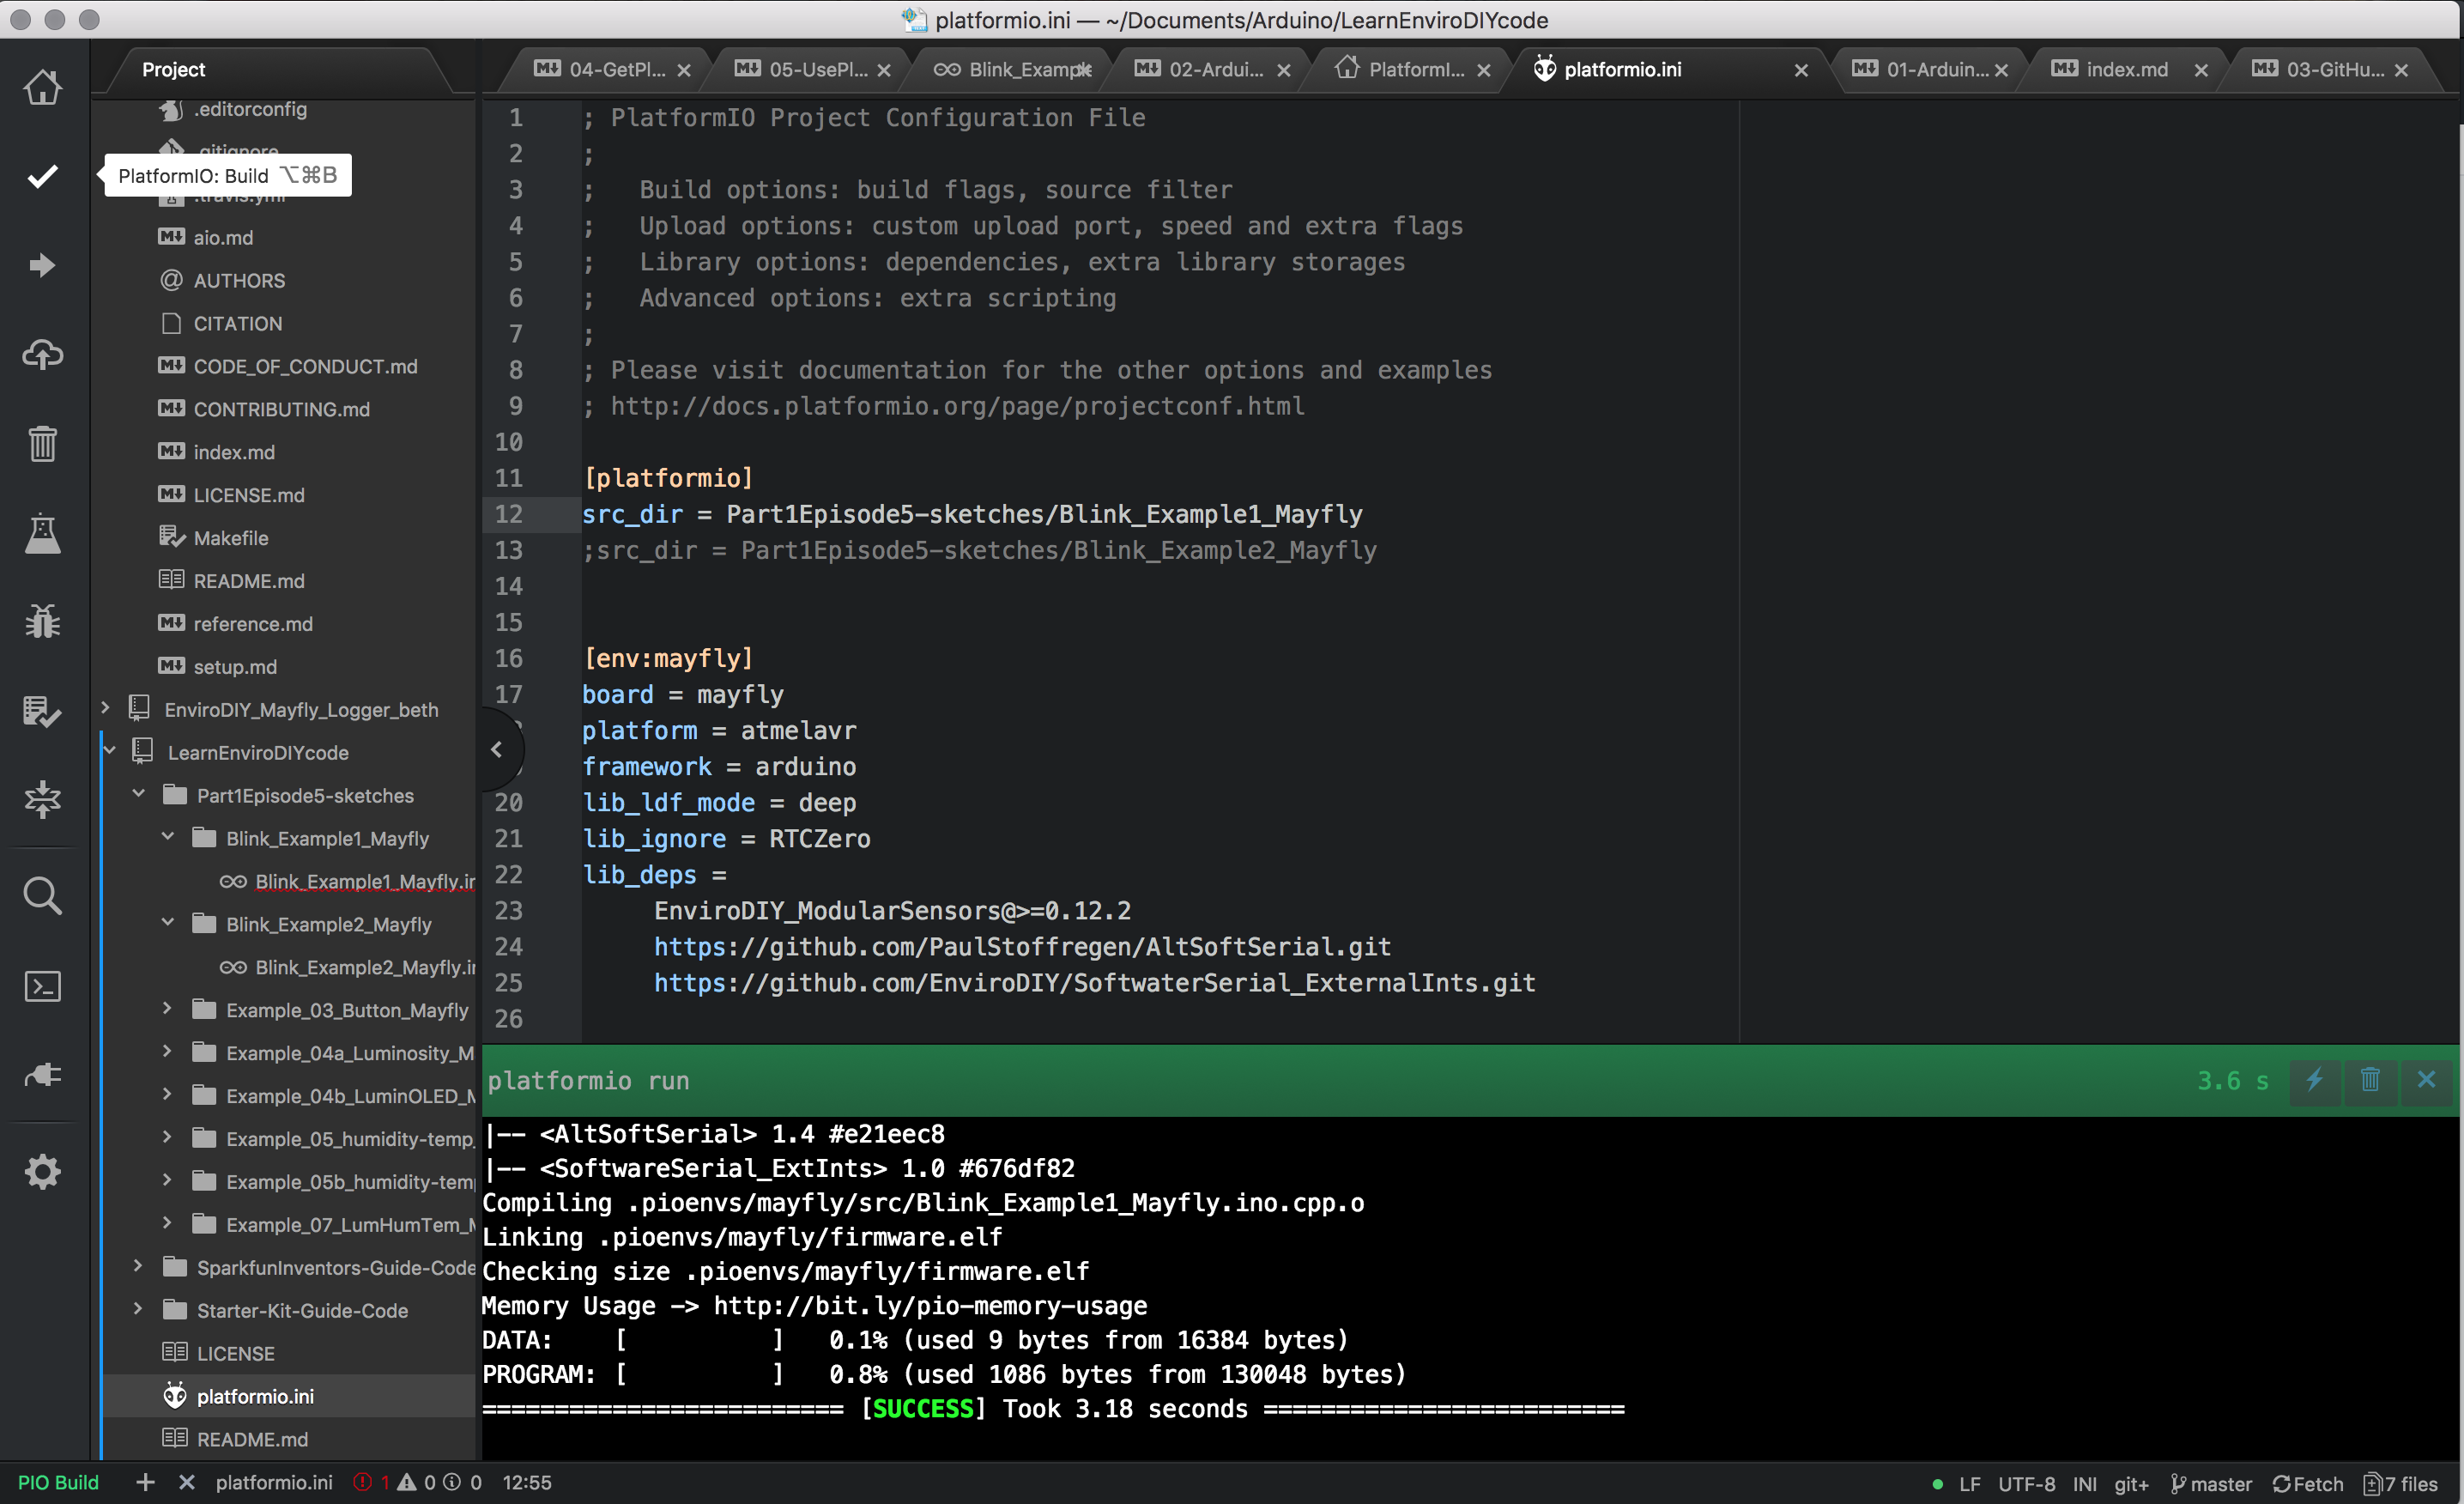
platformio.inifile is where you give PlatformIO instructions, and we have it set up for your first sketch. We specified the board and framework you are using (e.g. board = mayfly and framework = arduino), thelib_depsneeded for the sketch, and other information that you will not need to change. The part that you will need to change is the source directory, which is where PlatformIO will look for the Arduino sketch to “Build” and “Upload”, located under[platformio]. Currently the source directory is set assrc_dir = Part1-sketches/Example_01_Mayfly_blink(in line 12), which is what we want to use as our first sketch.Notice line 13 has a different source directory listed, but it has a semicolon (;) at the beginning, which comments out this line. We commonly keep a list of the source directories that we are actively using and add or remove the semicolon to switch between sketches.
The
platformio.inifile must be located in the root directory for your project. When you start using Modular Sensors, many of the sketches will have a “platformio.ini” file included in the sketch directory; these exist so you do not have to guess which “lib_deps” you will need to run the sketch, and not guessing is awesome. But PlatformIO will only look for the “.ini” file in the root of the active directory. Each project needs its ownplatformio.inifile.ALSO NOTE: If you are working with a group and syncing to GitHub, you do not want to upload your root
platformio.inifile to GitHub (list it in the gitignore and/or uncheck it when pushing your contributions to GitHub).For more information, see PlatformIO Documentation on
platformio.inifor detailed documentation about all the syntax options.
- Step 6: Connect the Mayfly logger using the USB cable included in your starter kit. Turn the Mayfly on. Push the Build button (checkmark). You should see a terminal pop up and lines of text will scroll through the terminal, and if all goes well, it will conclude with a green bar that says “platform run” and “[SUCCESS]” in green, as shown below. Sometimes the system takes a little while to compile and gives an error message ending in “No such file or directory.” If you get this error message, wait ~30 seconds and Build again.
- If you have trouble compiling, it is possible that you your
.piolibdepsare:- Still installing, and if so, wait for them to complete; and
- Corrupted for some reason, and if so, try updating following the instructions at in this GitHub issue #247 comment.
- If you have trouble compiling, it is possible that you your
- Step 7: Upload the sketch to the Mayfly by pushing the right arrow button.
The success indicator will look the same as in Step 6. And the green LED on your Mayfly will blink on and off!
- If you have trouble connecting to the Mayfly:
- Check that the Mayfly is turned on;
- Check that the tiny power source switch on the top of the Mayfly is set to USB/Lipo rather than Ext (12V) power source;
- Confirm that you have a good USB data cable (some micro-USB cables are only for charging, and old cables can become damaged); and
- Confirm that you have installed the Arduino IDE desktop software, which will install the proper drivers to recognize the board as a COM port. If you started at the beginnning of this tutorial, you already have the Arduino IDE.
- NOTE for Installing Arduino Desktop IDE for Windows: If your IDE does not recognize a COM port for your board, you may need to follow these instructions to install the board drivers. This might happen if you installed from the Windows Zip package. If you used the Windows Installer (admin privileges required), then the drivers should have installed automatically.
- If you have trouble connecting to the Mayfly:
The
lib_depstalkI told you in the last episode that we are using PlatformIO so it can keep track of complicated libraries for us. If this tutorial is your Arduino starting point, you may have avoided library management. If you spent much time using the Arduino IDE prior to this tutorial, you may have discovered that you needed to download libraries manually and keep them in a very specifically located and perfectly named directory. Keeping track of updates to libraries was a manual task. (Note, Arduino IDE added a library manager that seems to make life a little easier than when I learned to use it.) Herein we discuss how PlatformIO handles libraries, where it puts them, and how you keep track of them.
The
platformio.inifile has a category for the library dependencies that you need for each sketch. We are slightly cheating in this tutorial by referencing the full collection of library dependencies for Modular Sensors from the start because that more than covers the dependencies required by the tutorial sketches. EnviroDIY has a collection of all of the libraries needed to run the Modular Sensors sketches, skillfully curated in a way that collects the current version of several external libraries needed to support all of the functions and sensors in Modular Sensors. It’s brilliant. Essentially, thanks to how brilliant it is to use with PlatformIO, you would not have to think aboutlib_depsfor this whole tutorial, so we have to take this little break to teach you what you need to know.When you pushed the Build button for your first sketch, PlatformIO created a directory:
.pio, which inlclues a directory calledlibdeps. If you look in thelibdepsdirectory, you will see the names and models of several sensors. These sensor libraries were curated for you by directing PlatformIO to get libraries from EnviroDIY_ModularSensors. You could direct PlatformIO to each of these libraries independently, and we did this for the some libraries listed in theplatformio.inifile.You may notice that many items listed under
lib_depsin yourplatformio.inifile look like URLs. These are links to GitHub repositories, which allows you to get the current version of the libraries. Here are three ways you can link to libraries:
https://github.com/EnviroDIY/ModularSensors.git
- This is a link directly to the repository. PlatformIO knows how to get the library files from the latest files on the default branch (they are .cpp and .h files which stand for C++ and header, respectively).
https://github.com/EnviroDIY/ModularSensors.git#a84934eebc1fadef8b372dc0251cb3b127c8f71a
- This syntax allows you to fetch a specific version of the library, and is also listed in your
platformio.inifile for the purpose of demonstration. The character string after the # is a unique identifier for a specific commit on GitHub. You can use this format in yourlib_depsto build the libraries as they were at a specific point in the history of Modular Sensors. If you need to use a specific commit, find the commit number on GitHub and paste it after the #, and make yourself a commented out note about what that features are included in that commit. When I deploy sensors, I use this format to keep track of the exact commit I used for each deployment.EnviroDIY_ModularSensors
- This approach points to one of the hundreds of libraries that have been pre-registered by PlatformIO as listed at https://platformio.org/lib. The benefit of this approach is that it uploads much faster, because it excludes all the documentation files.
EnviroDIY_ModularSensors@=0.21.2
- This directs PlatformIO to go get a specific officially released version of the library, along with the specified releases of all dependencies. This can be very valuable as you deploy and upgrade numerous stations over time.
For more information, see PlatformIO Documentation on
lib_depsand on to platformio lib install for detailed documentation about all the syntax options.
In the next tutorial we will begin to add sensors to the Mayfly monitor their performance using the serial port.
Key Points
Translate skills from earlier tutorials using Arduino UNO and Arduino IDE to a new PlatformIO IDE and the EnviroDIY Mayfly logger.