Installing PlatformIO
Overview
Teaching: 0 min
Exercises: 45 minQuestions
How will I manage extensive Arduino libraries?
What are the benefits of a code text editor?
How can I easily compare two codes files?
Which buttons do I push in PlatformIO?
Objectives
Download PlatformIO and VSCode. Test PlatformIO.
Episode 4: Installing PlatformIO
In this lesson we will prepare you to use PlatformIO, an Integrated Development Environment (IDE) for Internet of Things (IoT). PlatformIO IDE is extremely helpful (and we believe necessary) for keeping track of libraries and code differences when programming a data logger with the EnviroDIY Modular Sensors library. You will install PlatformIO, and become acquainted with many of its features, including file management, syntax highlighting, code difference tracking, code debugging, library management, and integration with Arduino and GitHub.
VSCode and PlatformIO
PlatformIO IDE is hosted within a text editor designed for editing code. Most code text editors highlight syntax and have special auto-complete and debugging features based on elements of the code. PlatformIO can be hosted by several text editors, so if you are a coder and already use VSCode or Sublime, please feel free to install PlatformIO for your favorite editor. The original combination was PlatformIO hosted within VSCode text editor. Since Microsoft took ownership of GitHub, their VSCode has become the “recommended” download for PlatformIO (we used to use Atom, but have found that support for Atom is dwindling). If you choose a different text editor, some of the buttons and commands will be located in different places, but all of the functionality will be preserved.
- Install Git
- You need to have an all-purpose Git Client installed to use the library functions in PlatformIO. Although you installed GitHub Desktop, its Git client is only used by that application. (You may hove done this as the last step in Episode 3.)
- Download and install Git from https://git-scm.com/downloads. Install selecting all the defaults (make sure your PATH environment allows Git from command line and also from 3rd-party software). We find it best to reboot your computer before installing PlatformIO and VSCode.
- Install PlatformIO for VSCode.
- This page will guide you to first install Visual Studio Code. After you install VSCode, follow the PlatformIO for VSCode Installation Instructions.
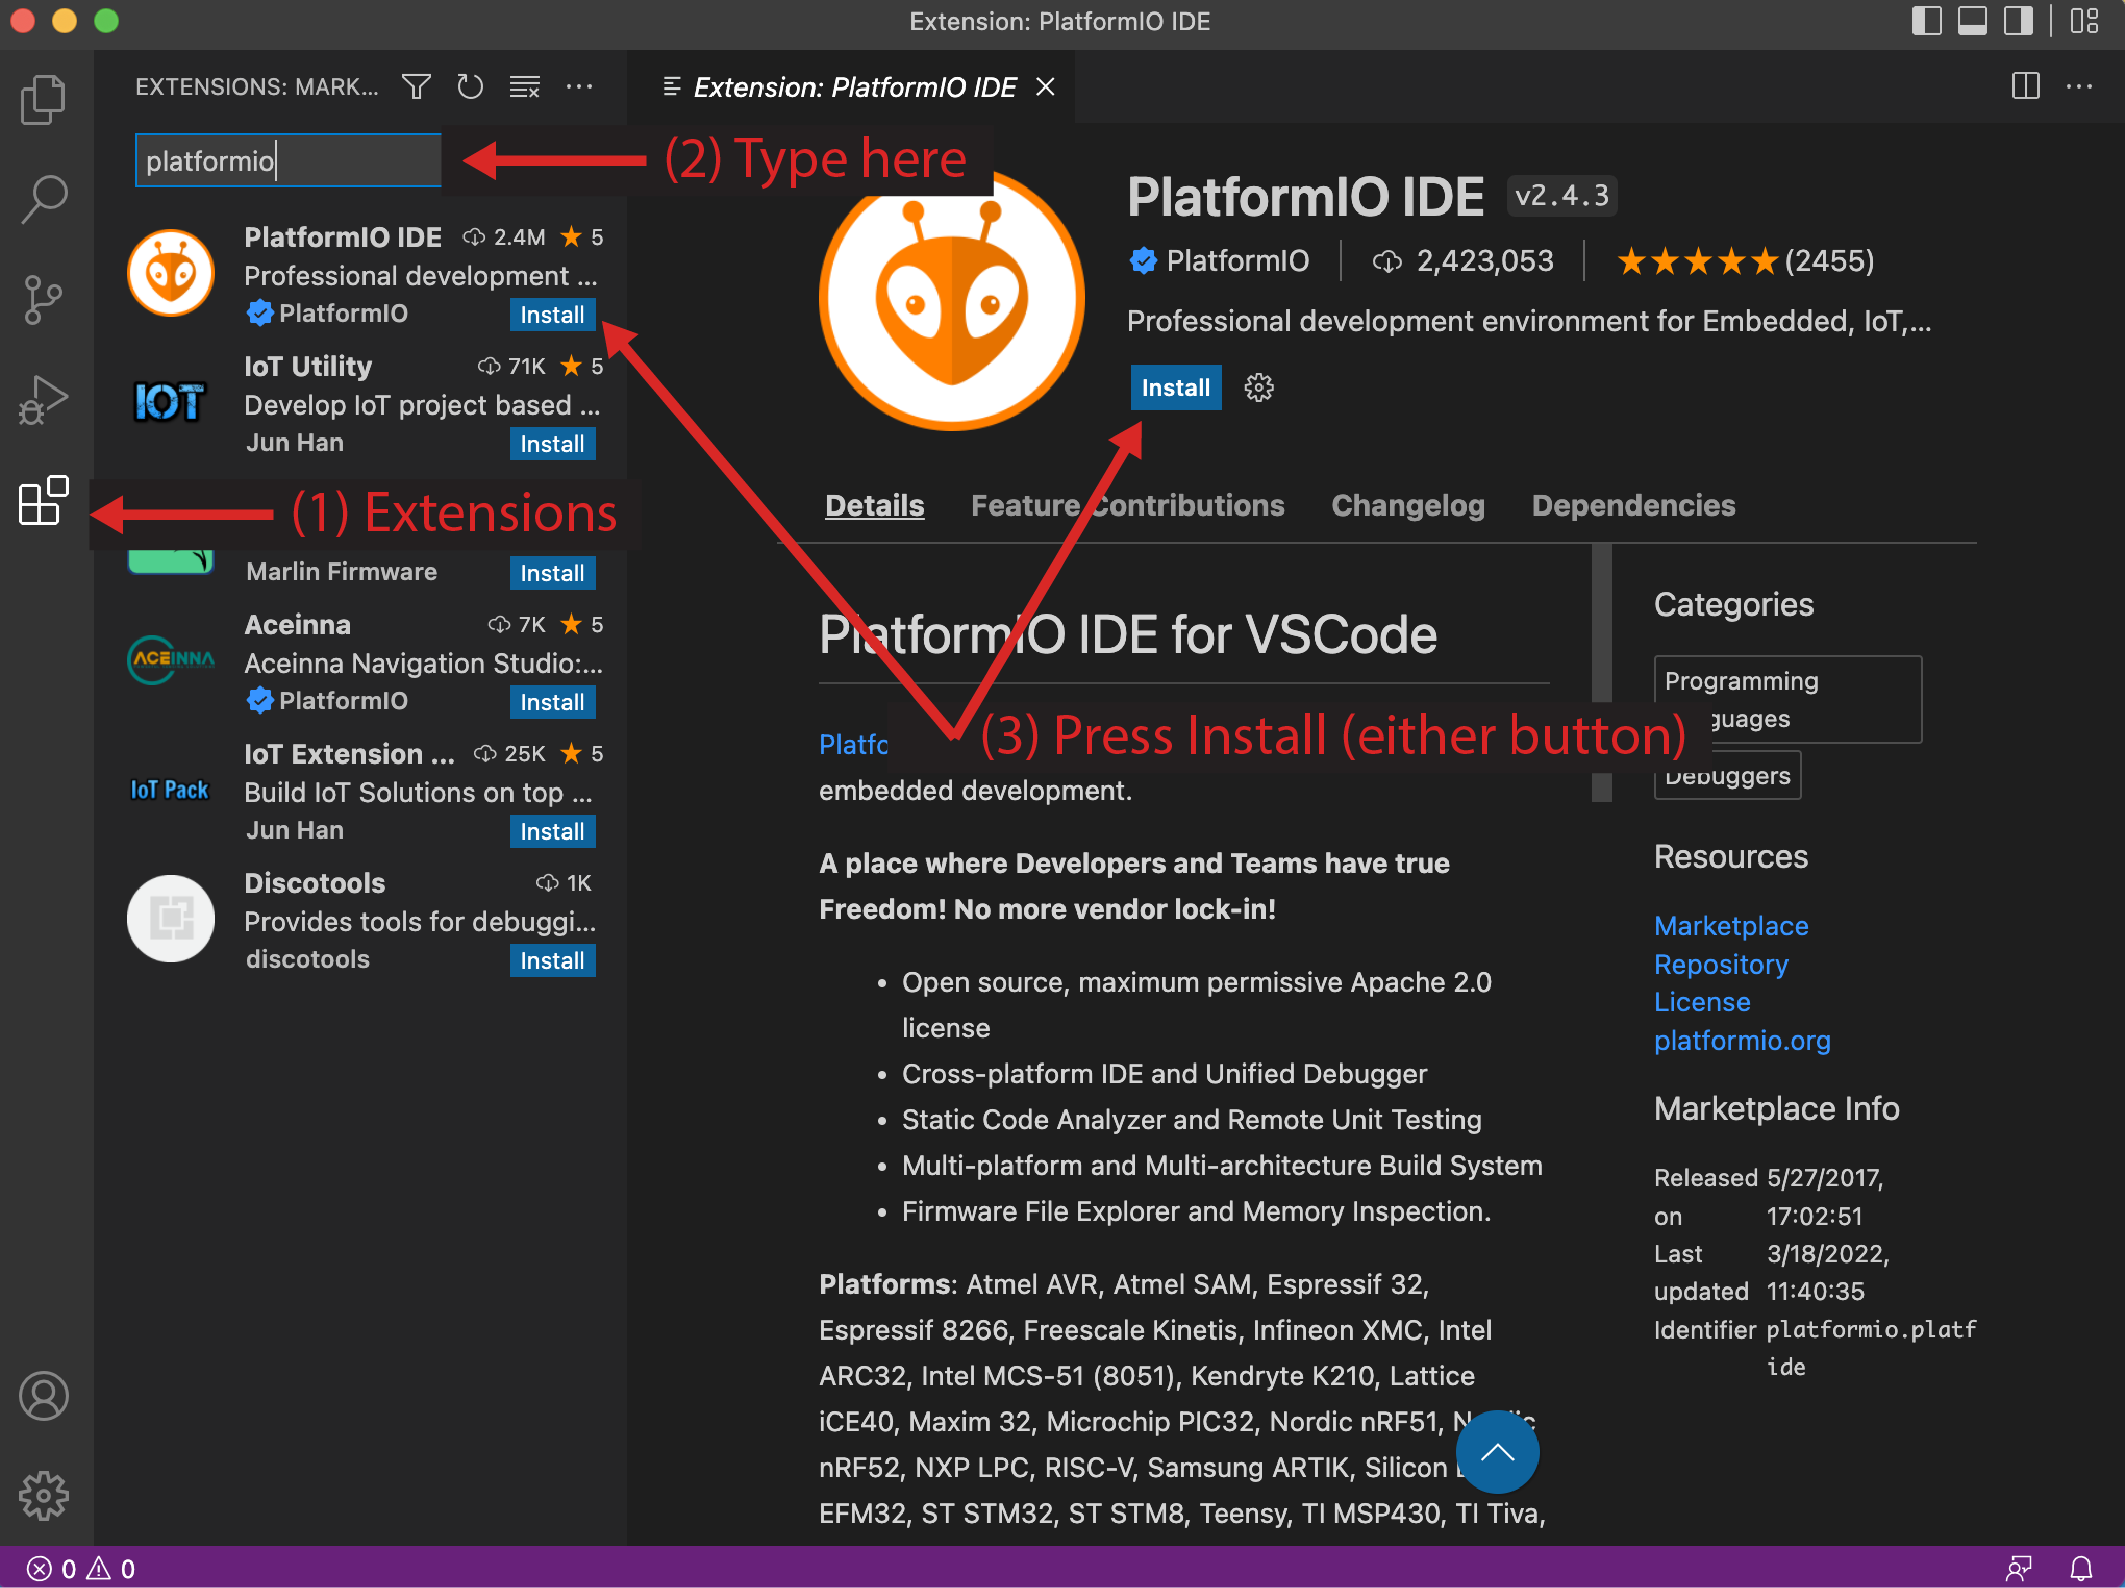
- After installing VSCode, open VSCode and install PlatformIO from within VSCode. As pictured below, you will go to (1) Extension in VSCode (4-square symbol), (2) type “platformio” into the extensions search box and (3) Click on the install button and follow any additional instructions (such as to restart) to complete the installation.
- Installation may take a while, as a lot of dependencies (i.e. other libraries and plugins used by PlatformIo) are also being installed.
- Many of the details of this installation process (and more) are included in this hour-long, but well-indexed video Getting Started with PlatformIO by DroneBot Workshop.
- As recommended on the download page, read through the PlatformIO quick start guide for VSCode.
- NOTE 1: VSCode might recommend that you install the “Arduino” extension for the
.inofile types. DO NOT do this, as it will conflict with PlatformIO. - NOTE 2: Changing Serial Monitor baud rates can’t be done through the VSCode IDE, but rather requires a new line in the PlatformIO.ini file. See:
- https://docs.platformio.org/en/latest/ide/vscode.html#serial-port-monitor and
- https://docs.platformio.org/en/latest/projectconf/section_env_monitor.html#projectconf-monitor-speed
- FURTHER NOTES: If you encounter other VSCode tips and tricks that we should include, please submit these to the LearnEnviroDIY issues on GitHub.
What you can see in PlatformIO
In the following sections we will take you on a tour through the PlatformIO user interface to describe which features of PlatformIO you will need for using EnviroDIY Modular Sensors sketches.
PlatformIO Toolbar:
- The PlatformIO Toolbar location varies depending on your code text editor. The VSCode toolbar is at the far left of this screenshot and the PlatformIO window is embedded within VSCode.
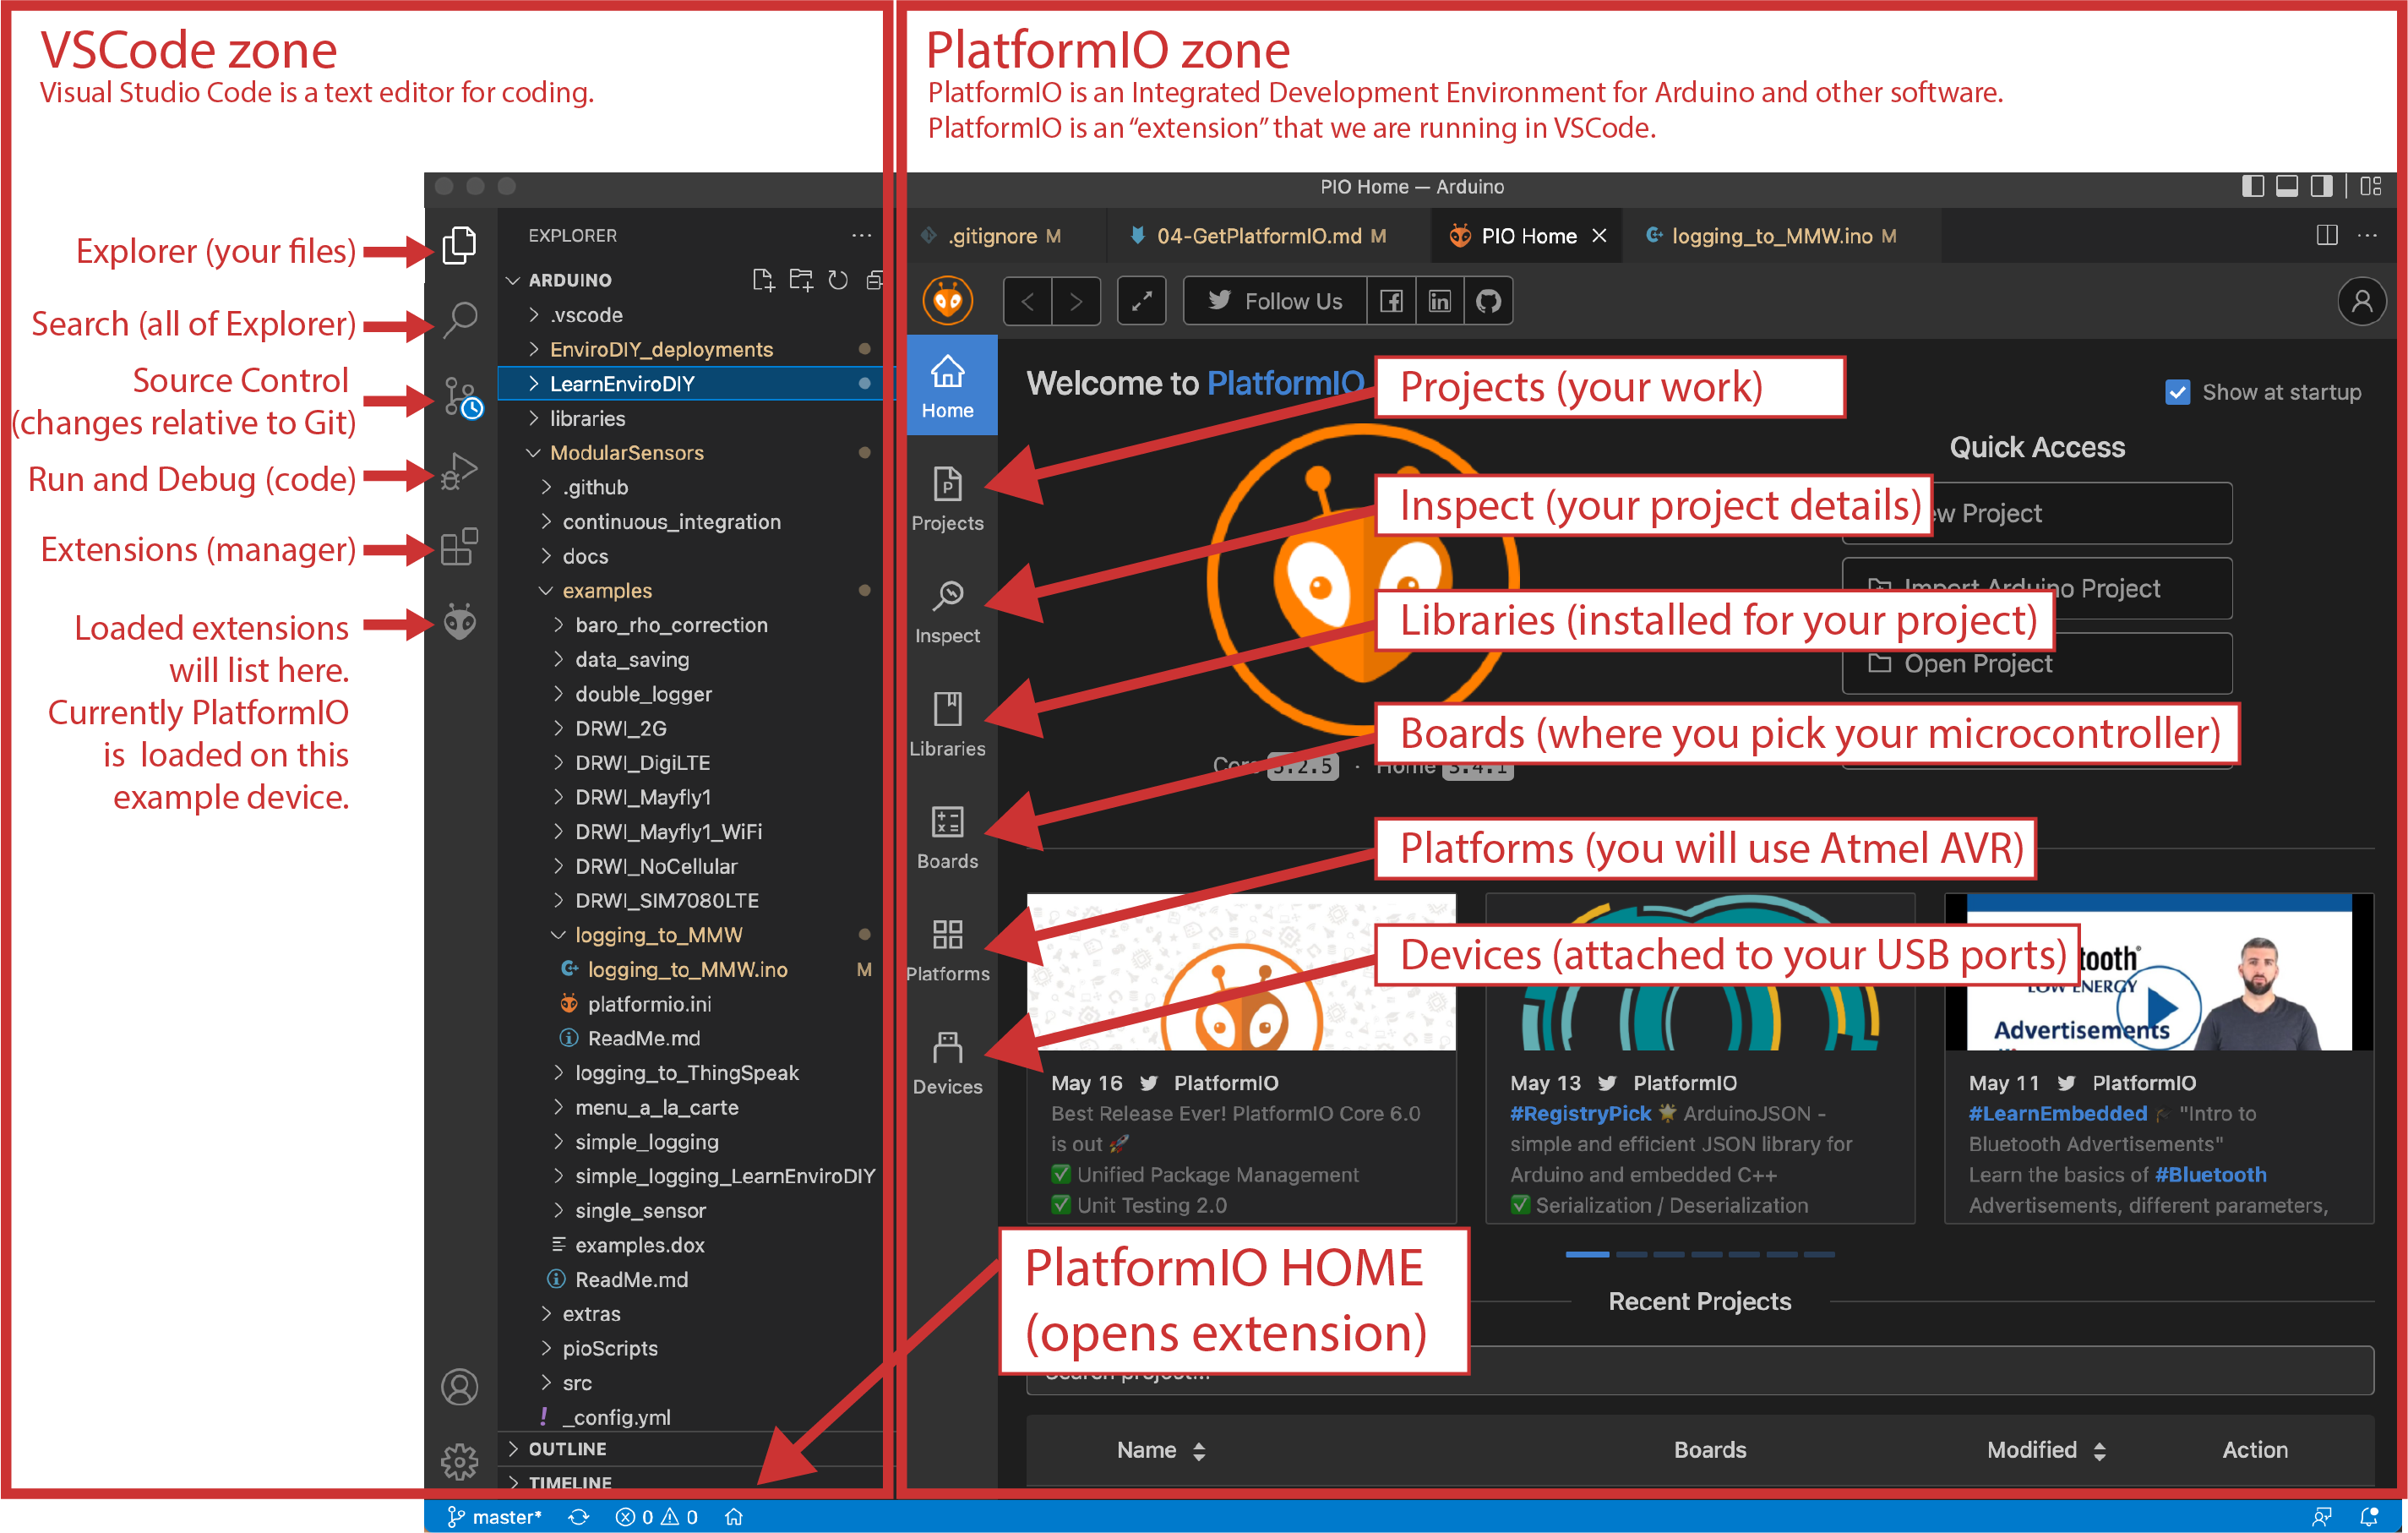
PlatformIO Home. This is where you will manage software updates for PlatformIO and other libraries that PlatformIO sees you using. You will know when updates are needed because they will be marked with bright badges. You also create a PlatformIO account here, which you need if you use some of the development capabilities (not necessary as you get started).
Projects. All of your Arduino work will be stored as projects. Once you add a project in PlatformIO, you will have more menu items across the bottom bar of the VSCode window. You may have work open from multiple projects at a time.
Inspect. Details about each of your projects will be here, including memory usage and debugging information.
Libraries. This makes it easy for you to see the libraries and versions that are currently installed in your project. PlatformIO manages the libraries for your Arduino projects.
Boards. Many Arduino framework microcontroller boards are listed here as pre-configured boards. This means that PlatformIO will know your board’s platform, memory, and clock frequency. If you are using the EnviroDIY Mayfly, you will select that board here.
Devices. Each Arduino board that you connect to your computer will have a unique port assignment. On a PC this will be a COM + a number. On a Mac this will be a character string containing USB.
Home (house icon). This is the most direct way to go the PlatformIO Home in VSCode. When you have a project installed/open, there will be several more PlatformIO icons next to this Home icon, and these are the tools you will use most for your Arduino work, as shown below. This is where you will manage software updates for PlatformIO and other libraries that PlatformIO sees you using. You will know when updates are needed because they will be marked with bright badges. You also create a PlatformIO account here, which you need if you use some of the development capabilities (not necessary as you get started).
The Bar of EVERYTHING:
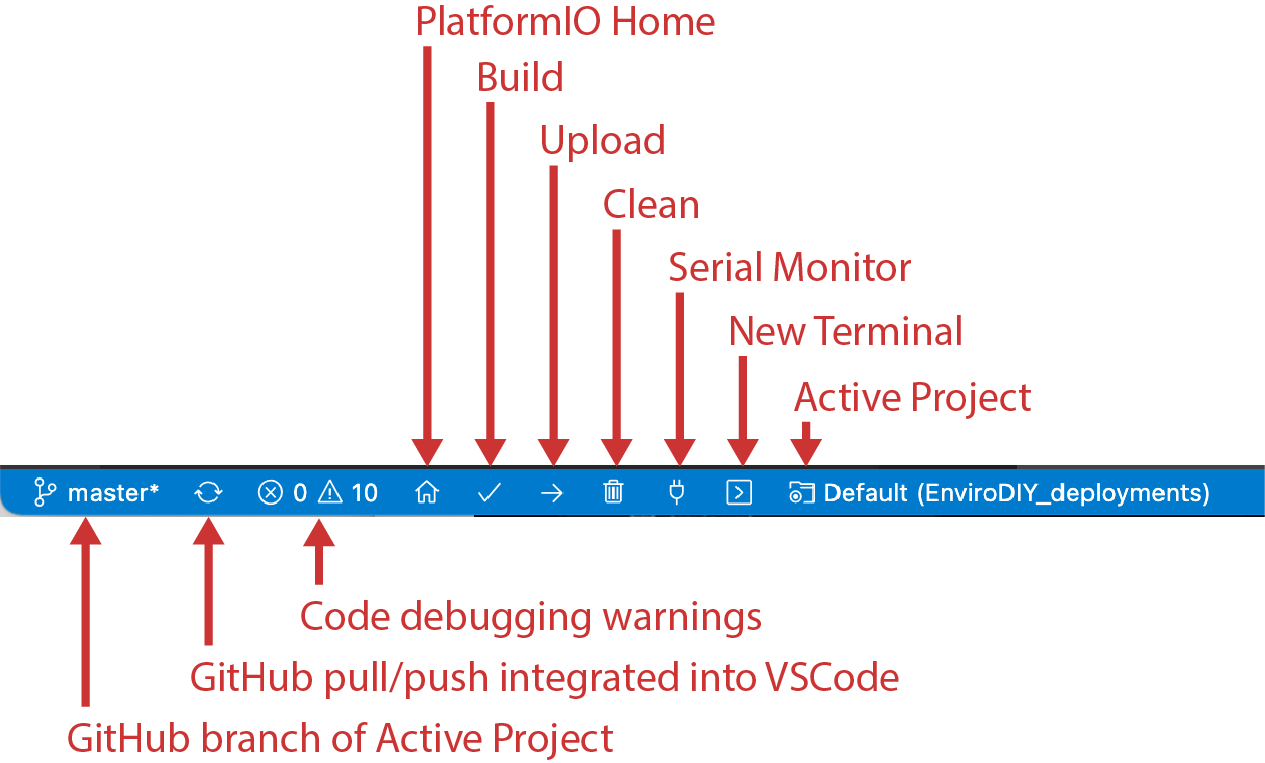
- This understated bar at the bottom of your VSCode window is the main set of tools that you will use in PlaformIO for Arduino.
Build (checkmark). This is the button you push when your sketch is ready and your platformio.ini is pointing to all of the right files and repositories for your sketch. This process will list color-coded errors (and successes) as it runs the build. I have found that the error messages are usually pretty understandable and repairable, so keep calm and READ THE MESSAGES. Red error messages will not allow you to proceed. Yellow error messages will allow you to proceed.
Upload (right arrow). This is the button that will send your sketch to your Arduino board. You need to Build before you Upload.
Clean (trash can). This removes previously compiled files and can be helpful to clear any compile errors. The only downside is that it will need to recompile all files, which can take a bit longer to complete.
Serial Monitor (power plug). This is your window into what’s happening on your Arduino board. The print statements that update you regarding the progress of your sketch show up here. Every time I upload a sketch this is where I see if it’s working correctly.
Terminal (cursor box). Command line access to the functions of PlatformIO. I use this when my pushes to GitHub create conflicts (while sharing a repository with others). You may not need to use this.
Project Environment (file folder). One of the most important things to notice in the PlatformIO environment is this directory name. This directory indicates which project is the active project, meaning that the platformio.ini file in the root directory of that project is where PlatformIO will look for instructions. You could have a dozen files open in PlatformIO, but the one named in the platformio.ini file in this directory is the only one that will Build and Upload. In the screen shot provided “EnfiorDIY_deployments” is the active project.
Explorer
This is basically Finder/Windows Explorer conveniently located right in PlatformIO. You can add, move, copy, and delete files and folders in this tab. Right-clicking on any of the items in your project will give you a list of possible actions. I also frequently use the “Copy Relative Path” option for naming the source directories in my platformio.ini file.
In the next episode, we will start uploading code to the Mayfly!
Key Points
PlatformIO provides an Integrated Development Environment (IDE) that combines all the capabilities of the Arduino IDE along with many advanced capabilities of a code editor that you will come to appreciate.